
Introduction
This page describes how Alexis Huxley installed, upgraded, migrated and configured Jira. It was last used to upgrade and migrate to 8.7.1.
Installing or migrating
- If migrating then upgrade the old system to the latest Jira first (see separate procedures below).
- Collect the following prerequisites:
- Jira software with the same version as the old installation (see https://www.atlassian.com/software/jira/download)
- Jira developer license (see https://id.atlassian.com/login?application=mac&continue=https://my.atlassian.com, requires a password, and click ‘View Developer License’)
- Determine the database host, database name username, password that the Jira software should use to access its database.
- MySQL Connector/J in tar.gz format (see https://dev.mysql.com/downloads/connector/j/)
- List of desired plugins.
- If migrating then backup the old Jira installation as follows:
- Export an XML backup of the Jira database (Cog–>System–>Import & Export–>Backup System) and note the directory you are told and the filename you specified.
- Shutdown Jira by running:
service jira stop
- Tar up /var/atlassian/application-data/jira by running something like this:
cd /var/atlassian/application-data/jira
tar cf ~/var-atlassian-application-data-jira.tar .
- Backup the MySQL database:
mysqldump jira > jira-db-dump.sql
- If the new installation will be on the same machine as the old installation then rename /opt/atlassian/jira.
- Backup the following files and directories:
- /opt/atlassian/jira/conf/server.xml
- /var/atlassian/application-data/jira/data
- Install the following prerequisite packages:
- fontconfig
- Run the Jira installer (.bin) file as root, accepting all defaults:
./atlassian-jira-software-8.7.1-x64.bin
but do not allow it to start the Jira server (we do this in order to facilitate checking if JRA-42000 has been fixed yet, which we’ll do in the next step).
- Reboot the machine, log in and see if any processes are running as the ‘jira’ user. If not then:
- Note that JRA-42000 has still not been fixed.
- insert the following in /etc/init.d/jira, after the ‘#!/bin/bash’:
### BEGIN INIT INFO
# Provides: jira
# Required-Start: $network $local_fs $syslog
# Required-Stop:
# Default-Start: 2 3 4 5
# Default-Stop: 0 1 6
# Short-Description: JIRA Server
# Description: Jira is a ticketing thing. It runs on java.
# It sometimes needs to be stopped and/or started.
### END INIT INFO
- Run:
systemctl enable jira
- Reboot again.
- Log in as root and verify that there are now processes running as the ‘jira’ user.
- Run ‘top’ and wait for the load to drop.
- Stop Jira.
- SKIP THIS!!! If migrating then:
- Rename the new Jira home to make space for the old home to be restored by running:
cd /var/atlassian/application-data
mv jira jira.delete-me-soon
mkdir jira          #  no need to fix owner/group/perms; tar will do that
- Restore the old Jira home to the new server by running something like:
cd /var/atlassian/application-data/jira
tar xf <path-to-the-tar-file-you-made-earlier>
- Rename the new Jira home to make space for the old home to be restored by running:
- If the Jira server is behind a front-end webserver then configure the back-end and front-end as follows:
- Run:
service jira stop
- If the URI path is not ‘/’ then edit /opt/atlassian/jira/conf/server.xml change change ‘path=””‘ to ‘path=”<uri-path>” (e.g. ‘path=”/jira/”‘). For me, this means do nothing.
- In the same file comment-out and comment-in the appropriate default/http/https blocks and correct the server’s FQHN. For me, this means:
- Comment out the ‘DEFAULT’ block
- Uncomment the ‘HTTPS’ block
- Correct the FQHN in the ‘HTTPS’ block to jira.pasta.freemyip.com.
- Run:
service jira start
- This step is probably obsolete:
- Log in as the Jira admin.
- You should see the following warning:

- To clear this warning complete the following sub-procedure:
- Go to Cog–>System–>Edit Settings.
- Set ‘Use gzip compression’ to ‘Off’
- Set ‘Base URL’ to the actual URL that users will use (i.e. the one Apache is presenting).
- Click ‘Update’ (at the bottom of the page.
- Verify that the warning is now gone.
- Run:
- Create a database for Jira as follows:
- Note that MariaDB is not supported but that MySQL is not included in Debian 10. Attempting to use MariaDB results in a webpage displaying:
Database: Supported database
MySQL 5.5 is not supported.
...
If you want to ignore these warnings and start Jira, you need to use the -Djira.startup.warnings.disable startup flag that will ignore the warnings.
But setting that flag (-Djira.startup.warnings.disable or -Djira.startup.warnings.disable=true) makes no difference. Therefore we have no option but to use MySQL.
- Run:
wget http://repo.mysql.com/mysql-apt-config_0.8.13-1_all.deb
dpkg -i mysql-apt-config_0.8.13-1_all.deb
apt-get update
Be sure to choose version 5.7 as version 8 does not work with Jira.
- Install the database server and connectors:
groupadd mysql
useradd -r -g mysql -s /bin/false mysql
apt-get -y -qq install mysql-server
- Create /etc/mysql/conf.d/jira.cnf containing:
[mysqld]
default_storage_engine=INNODB
character_set_server=utf8mb4
innodb_default_row_format=DYNAMIC
innodb_large_prefix=ON
innodb_file_format=Barracuda
innodb_log_file_size=2G
(Note that the official documentation says default-storage-engine – i.e. with hyphens instead of underscores – but this is wrong.)
- Restart mysql by running:
systemctl restart mysql
- Install Connector/J where Jira can find it by running:
tar xzf mysql-connector-java-5.1.48.tar.gz
cp mysql-connector-java-5.1.48/mysql-connector-java-5.1.48.jar /opt/atlassian/jira/lib/
- Run:
mysql
CREATE DATABASE jira CHARACTER SET utf8mb4 COLLATE utf8mb4_bin;
CREATE USER 'jira'@'localhost' IDENTIFIED BY '<PASSWORD>';
GRANT SELECT,INSERT,UPDATE,DELETE,CREATE,REFERENCES,DROP,ALTER,INDEX on jira.* TO 'jira'@'localhost';
flush privileges;
\quit
- Note that MariaDB is not supported but that MySQL is not included in Debian 10. Attempting to use MariaDB results in a webpage displaying:
- If you want to use the wizard to configure the database connection then:
- Start Jira by running:
systemctl start jira
- At the ‘Jira setup’ page, when prompted to choose between ‘Set it up for me’ or ‘I’ll set it up myself’, choose the latter and click ‘Next’.
- At the ‘Database setup’ page, when prompted to choose between ‘Built In’ or ‘My Own Database’, choose the latter, fill in the connection parameters (which only appear once you select ‘My Own Database’), click ‘Test connection’ and then click ‘Next’. This can take about 10 minutes to complete.
- Start Jira by running:
- If you want to do it manually configure the database connection then:
- Create /var/atlassian/application-data/jira/dbconfig.xml (preferably by copying an old version of the file).
- Start Jira by running:
systemctl start jira
- If migrating then:
- If using a front-end proxying webserver then:
- modify its configuration to proxy to the new Jira server instead of the old Jira server
- increase its timeout from 300 to 3600 by adding ‘timeout=3600’ to the ProxyPass line (this is needed during database construction)
- At the ‘Set up application properties’ window, click ‘Import your data’.
- Copy over the exported XML backup (actually a zip file) to the directory /var/atlassian/application-data/jira/import and make sure it is readable by jira.
- At the ‘Import existing data’ window:
- enter the XML backup filename
- paste in the developer license
- enable outgoing mail
- click ‘Import’
- wait up to 15 minutes.
- In order to avoid the Jira server throwing 500 errror when viewing versions page, reboot the system now.
- Restore the contents of /var/atlassian/application-data/jira/data.
- Verify projects, issues and workflows look correct, including the presence of avatars and images attached to tickets.
- Review the server logs.
- If using a front-end proxying webserver then:
- remove access restrictions on the front-end web proxy.
- revert its timeout from 3600 to 300 (this was needed during database construction)
- If using a front-end proxying webserver then:
- If installing for first time then:
- Note that the screenshots below are from version 6.1, so things might look different now!
- Set the Application Name to just ‘Jira’ and the Mode to ‘Private’ and click ‘Next’. (Leave the base URL alone, we will handle that shortly.)
- The screen should now look like this:
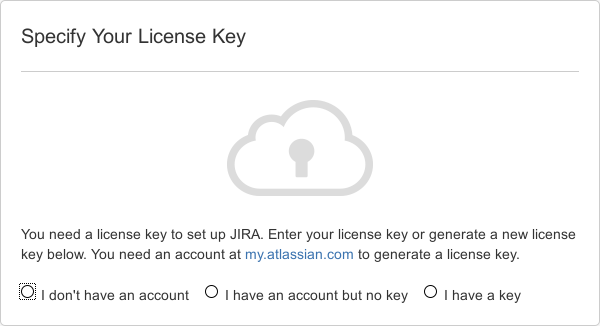
- Select ‘I have a key’ and the system’s Jira server ID will be displayed.
- Visit https://id.atlassian.com/login?application=mac&continue=https://my.atlassian.com and click ‘View License’.
- Enter the server ID and click ‘Save’, the license will be displayed.
- Back in the install wizard, enter the license and click ‘Next’.
- The screen should now look like this:
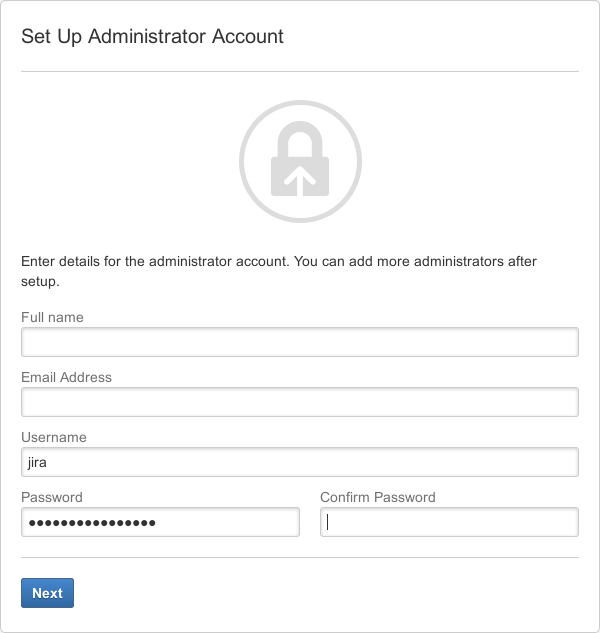
- Enter your full name and email address. (Do not change the user name from ‘jira’.)
- The screen should now look like this:
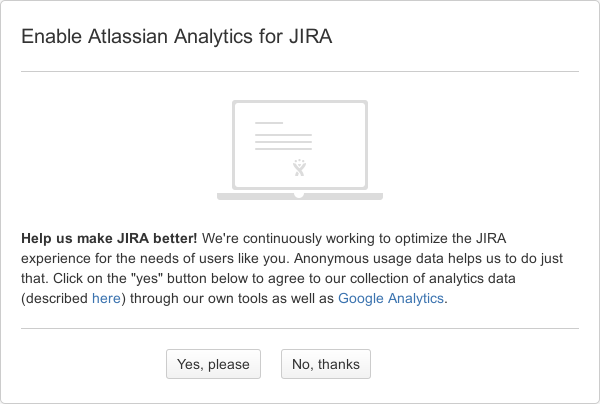
- Click ‘Yes’ or ‘No’ according to you desire (I click ‘No’).
- The screen should now look like this:
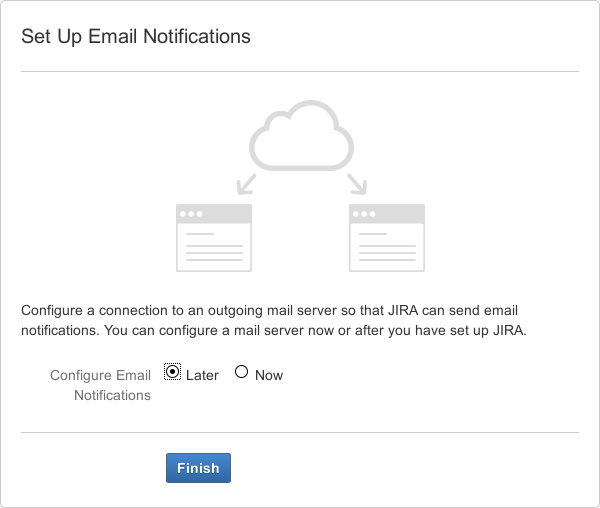
- Select ‘Now’ and fill in the parameters for your SMTP server. Be sure to change the from address to ‘jira@…’ instead of the default (which is probably your own address).
- I should have clicked Test Connection.
- Click ‘Finish’ and wait a couple of minutes.
- Install desired plugins as follows:
- Log into your JIRA instance as an admin.
- Click the admin dropdown and choose Add-ons. The Manage add-ons screen loads.
- Click Find new add-ons from the left-hand side of the page.
- Locate JIRA Subversion Plugin via search. Results include add-on versions compatible with your JIRA instance.
- Click Install to download and install your add-on.
- Click
 –> Addons –> Subversion Repositories.
 - Enter the Display Name and the Repository Root and click ‘Add’; this will take a while to process.
Adding users
All actions are done through the web interface as a user with Jira administrator privileges.
- Click , then ‘User Management’ (or just type .users).
- The easiest way to add users is to send them invites by clicking on ‘Invite Users’.
- Once you have signed up, then you might want to rationalise the list of users (I had my full name assigned both the ‘jira’ account and my personal account). This may require assigning users to sufficient groups so that somebody is still has administrator rights.
- Note that all users must be in the jira-users group else they can’t log in. (This applies even to those users in jira-administrators, else they can’t make dashboards.)
A word about objects and object schemes
A workflow is a set of states and state transitions (e.g. “Begin work” could be a state transition between states “To do” and “In progress”). A workflow scheme is a set of workflows, one for each type of issue in a project (e.g. Bugs may follow one workflow, whereas feature requests may follow another).
More genertally, this relationship between an object and an object scheme applies to:
- workflows
- field configurations
- issue types
- screen, permissions
- notifications
- …
When creating a project, Jira creates project-specific objects based on what sort of project you define (e.g. Simple Issue Tracking, Software Development Project, …). If you have many projects that should always use the same object even if that workflow needs to be modified (e.g. workflow for for software projects) then it makes most sense for them to use one common object and object scheme, rather than the project-specific ones that Jira instantiated.
Much of what follows is about creating and tuning new objects, so that when a new project is created it can be configured to use these objects.
Text renderers
All actions are done through the web interface as a user with Jira administrator privileges.
- Click –> Issues –> Field Configurations (the list of fields and which can use which renderer).
- Copy the “Default Field Configuration” to “Software Development Field Configuration” and copy it again to “Simple Issue Tracking Field Configuration”.
- Repeat the above steps for Field Configuration Schemes (the list of which issue types will use which fied configurations).
- Click –> Issues –> Field Configurations Schemes and set each of the just-added field configuration schemes to use the correspondingly-named field configuration.
- Click –> Issues –> Field Configurations and for each of the just-added configurations:
- click ‘Configure’
- for the ‘Software Development Field Configuration’, for the ‘Description’ and ‘Comment’ fields, change the renderer to ‘Wiki Style Renderer’
- for the ‘Simple Issue Tracking Field Configuration’, for the ‘Description’ and ‘Comment’ fields, change the renderer to ‘Default Text Renderer’
Workflows
All actions are done through the web interface as a user with Jira administrator privileges.
- Click –> System –> Time Tracking.
- Click ‘Deactivate’.
Note that once a workflow has been written, then it may be impossible to add transitions from “final” states!
Permission schemes
Issue type schemes
Disabling logging work
Comments entered as logged work do not appear in the print-view of a ticket because they are really meant for accountancy purposes only. However, this isn’t necessarily apparent to users. So it may be appropriate to disable this kind of accountancy.
- ?
Facilitating anonymous read-only access
- Cog –> Issues –> Permission Schemes
- There should be one permission scheme listed, entitled ‘Default Permission Scheme’
- Copy this scheme to make a new scheme entitled ‘Default permission scheme but with read-only anonymous access’
- There should now be two permission schemes listed.
- Click ‘Permissions’ next to the new scheme.
- In the ‘Browse Projects’ row, click ‘Add’, then ‘Group’ and from the pulldown menu select ‘Anyone’, then click ‘Add’ to confirm
The above is enough to allow anonymous users to be able to browse only specific projects, but it is not enough to stop them from making state transitions (e.g. To Do –> Fixed). That is handled below.
This section is based on message <4475336.375721303343141354.JavaMail.j2ee_forums.atlassian.com@atlassian12.managed.contegix.com> posted to the Jira Users mailing list on Wed, 20 Apr 2011 18:45:11 CDT:
> Aside from adding a condition to each transition to check if you are a registered user, are there
> any ways to set a universal permission to not allow anonymous users to make any changes to status?
> This seems like a strange thing to allow out-of-the-box, so I feel that I'm missing something somewhere.

I suspect it was the same before, but more obvious now.  You should be including a condition on every
workflow transition, no matter what it is, if you allow any form of anonymous access.  (This is something
that I don't feel is well signposted in the docs - it *is* written up, but not as a big red "gotcha")
The steps below deal with that are as follows:
- Cog –> Issues –> Workflows
- Note the list of workflows
- Log out, view projects using each of the noted workflows, try changing the state of an issue, note whether it was possible, log back in.
- Cog –> Issues –> Workflows
- For each workflow listed:
- Click Edit
- For each transition (and there will be several for each step):
- Click the name of the transition
- Click the ‘Conditions’ tab and then click ‘Add’
- Select ‘User Is In Group’ and the click ‘Add’
- From the pulldown menu select ‘jira-users’ and click ‘Add’
- Click ‘Publish Draft’
- Select to save a backup copy, give it a suitable name and click ‘Publish’
- Log out, view projects using each of the noted workflows, try changing the state of an issue, note whether it was possible.
Adding projects
All actions are now done through the web interface as a user with administrator privileges.
- Click ‘Projects’ and ‘Create Project’.
- The screen should now look like this:
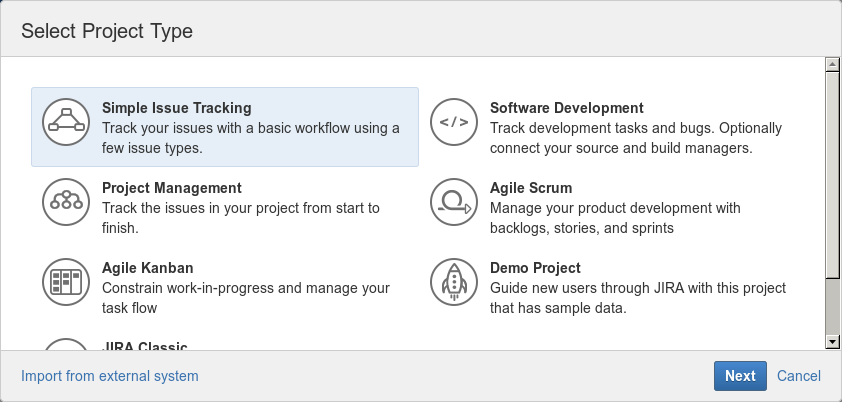
- Click ‘Simple Issue Tracking’ (I might change this later) and click ‘Next’.
- To change the project avatar, select the project, click the ‘Administration’ tab, click the ‘Edit Project’ button, click the existing avatar, then click the ‘Browse’ button.
- To change the workflow scheme … (don’t forget to then delete the automatically created but no longer needed workflow scheme and workflow)
- To assign users to roles …
- jira-users should be removed from the project (because all users must be in jira-users, but you don’t necessarily want all users to be able to access your project.
- Change the permissions scheme?
- Click –> Project –> <project-name> –> Fields –> <name-of-current-field-configuration-scheme> –> Actions –> Use a different scheme.
- Choose ‘Software Development Field Configuration Scheme’ or ‘Simple Issue Tracking Field Configuration Scheme’, based on the type of project.
- If anonymous read-only access to issues is to be allowed then:
- from the project administration interface, in the ‘Permissions’, then ‘Actions’ and ‘Use a different scheme’, and from the pulldown menu select ‘Default permission scheme but with read-only anonymous access’ and then click ‘Associate’ to confirm
- test by logging out and checking what projects are visible.
Upgrading from 6.1 to 6.2
- The upgrade can be reasonably on-the-fly, according to the rapid upgrade method.
- However, afterwards Jira failed to load with the following error:
Oops, you’ve found a dead link.
- Go back to the previous page
- Go to the Home Page
- Because the target of that ‘Home Page’ link is not correct, it suggests that Jira has forgotten that it is meant to be proxied. Therefore I re-ran the instructions in the ‘Proxying Jira’ section above. Then it started working.
Upgrading from 6.2 to 6.4
- Rerun the instructions in the ‘Proxying Jira’ section above.
Upgrading from 6.4 to 7.1.4
- Rerun the instructions in the ‘Proxying Jira’ section above.
- Update add-ons:
- Go to Cog–>Add-ons–>Manage Add-ons; from the pulldown menu select ‘Action required’ and then click ‘Update all’.
- The ‘Atlassian Universal Plugin Manager Plugin’ add-on had to be done in a second pass of updating add-ons.
- A database re-index is suggested (and can be done with a click).
Upgrading from 7.1.4 to 7.3.2
- Rerun the instructions in the ‘Proxying Jira’ section above.
- Update add-ons:
- Go to Cog–>Add-ons–>Manage Add-ons; from the pulldown menu select ‘Action required’ and then click ‘Update all’.
- The ‘Atlassian Universal Plugin Manager Plugin’ add-on had to be done in a second pass of updating add-ons.
- A database re-index is suggested (and can be done with a click).
Upgrading from 7.3.2 to 7.11.1
- Download a new version from https://www.atlassian.com/software/jira/download.
- If the system is a VM then:
- shut down the VM
- backup the disk image
- restart the VM
- Backup the MySQL database:
mysqldump jira > jira-db-dump.sql
- Make local copies of the following files:
- /opt/atlassian/jira/conf/server.xml
- Run:
systemctl stop jira
- Make the download executable and run it.
- Answer as follows:
This will install JIRA Software 7.11.1 on your computer.
OK [o, Enter], Cancel [c] <ENTER>
Express Install [1], Custom Install [2], Upgrade existing installation [3, Enter] <ENTER>
[/opt/atlassian/jira] <ENTER>
Back up JIRA home directory? Yes [y, Enter], No [n] n
[Enter] <ENTER>
Do you want to proceed? Upgrade [u, Enter], Exit [e] <ENTER>
- At this point, before allowing the installer to restart Jira, backup server.xml and then apply all necessary edits.
- Then continue answering the installer as follows:
Start JIRA Software 7.11.1 now? Yes [y, Enter], No [n] <ENTER>
- Run ‘top’ and wait for the CPU usage to drop.
- Log in to Jira.
- Update add-ons:
- Go to Cog–>Add-ons–>Manage Add-ons; from the pulldown menu select ‘Action required’ and then click ‘Update all’.
- At this point I encounted a UPM error, but did the following to clear it:
systemctl stop jira
rm -fr /var/atlassian/application-data/jira/plugins/.bundled-plugins
rm -fr /var/atlassian/application-data/jira/plugins/.osgi-plugins/
systemctl start jira
- As the Jira web interfaces advises, then do a database reindexing.
Upgrading from 7.11.1 to 8.7.1
- Following the upgrade a notification reported:
The Attachments health check has failed in your system.
It looks like the directory /var/atlassian/application-data/jira/data, which has subdirectories attachments and avatars, does not get exported into the XML backup. I adjusted the procedure above accordingly.
- /var/lib/mysql contained enormous REDO logs:
gometi# ls -lh /var/lib/mysql/ib_logfile*
-rw-r----- 1 mysql mysql 2.0G Feb 20 12:09 /var/lib/mysql/ib_logfile0
-rw-r----- 1 mysql mysql 2.0G Feb 20 11:03 /var/lib/mysql/ib_logfile1
gometi#
which I cleaned these according to these instructions as follows:
gometi# mysql
mysql> SET GLOBAL innodb_fast_shutdown = 0;
mysql> ^D
gometi# mysqladmin shutdown
gometi# rm /var/lib/mysql/ib_logfile*
gometi# systemctl start mysql
gometi#
but that just recreated the REDO logs. i should consider moving /var/lib/mysql to a larger file filesystem.
Disabling Google Analytics
This does not seem to be possible. The documentation for Jira 6.3 (not 6.2) says:
Versions of JIRA prior to 6.3.3 and some Atlassian add-ons for JIRA had different analytics settings to those described below. Regardless of those settings data from those implementations is no longer being received by Atlassian.
Workaround for JRASERVER-66593
- Add the following to root’s crontab:
SHELL=/bin/bash
45 * * * * mysql jira <<<"delete from clusteredjob WHERE job_runner_key = 'com.atlassian.jira.plugin.ext.bamboo.service.PlanStatusUpdateJob';"