
Introduction
This page describes how to solve the following problem: a FRITZ!Box mesh repeater thinks it is part of a mesh but the FRITZ!Box mesh master thinks that the mesh repeater is not part of a mesh.
To help Google to help German googlers, who I guess are the main users of this equipment, here are the key phrases:
- “Diese FRITZ!Box ist Teil eines WLAN Mesh einer anderen FRITZ!Box” (that’s what the mesh repeater says)
- “Folgende FRITZ!-Produkte befinden sich noch nicht im WLAN Mesh der FRITZ!Box” (that’s what the mesh master says about the mesh repeater)
It is important to understand my own requirements so that you can adjust the procedure to suit your own requirements. My requirements are:
- both devices are to use a static IP configuration (i.e. I want to decide the IP addresses that the devices will use; I don’t want them to decide for themselves)
- both devices will commuicate with each other over ethernet (i.e. not over WIFI; they will both provide WIFI access to laptops, smartphones, etc but they will communicate with each other over ethernet)
- my mesh master is a FRITZ!Box 6660 (a WLAN/LAN router with builtin cable modem) but I will stick to using the term “mesh master”
- my mesh repeater was a FRITZ!Box 4020 (a WLAN/LAN router without builtin modem) but I will stick to using the term “mesh repeater”
Note that the use of these terms (“mesh master” and “mesh repeater”) is only to indicateon which device each step is to be performed; the terms do not indicate that they were already configured as those things. Configuring them as a mesh master and mesh repeater is what this procedure is all about!
A couple of final points:
- AVM (the manufacturer) has made a video available that makes it all look very easy but it did not work for me.
- If you try this procedure then, (of course!) I accept no liability for anything that might go wrong!
Prerequisites
- the box with the internet connection (DSL or cable):
- will be the mesh master
- is already connected to the home network
- is accessible (i.e. you can login intot to its web interface) from a computer connected (via ethernet cable or WIFI) to the home network
- you will need:
- a computer (or a mobile phone with a suitable ethernet adapter like this one) on which you don’t mind temporarily changing its network settings
- to know how to change the IP address, netmask, etc on that computer (or mobile phone)
- an ethernet cable
Setting up the mesh master
- Log in to the mesh master (this URL or perhaps this one may work for you).
- Go to Home Network –> Network –> Network Settings –> IPv4 Configuration: sset the IP address and netmask and press OK.
- Note that if you changed the IP address then you will need to allow time for the mesh master to reboot and that, after that, you will need to log in to the mesh master again but using its new IP address!
- Go to Home Network –> Mesh –> Mesh Settings: select ‘FRITZ!Box as the Mesh Master’ and press Apply, as shown here:
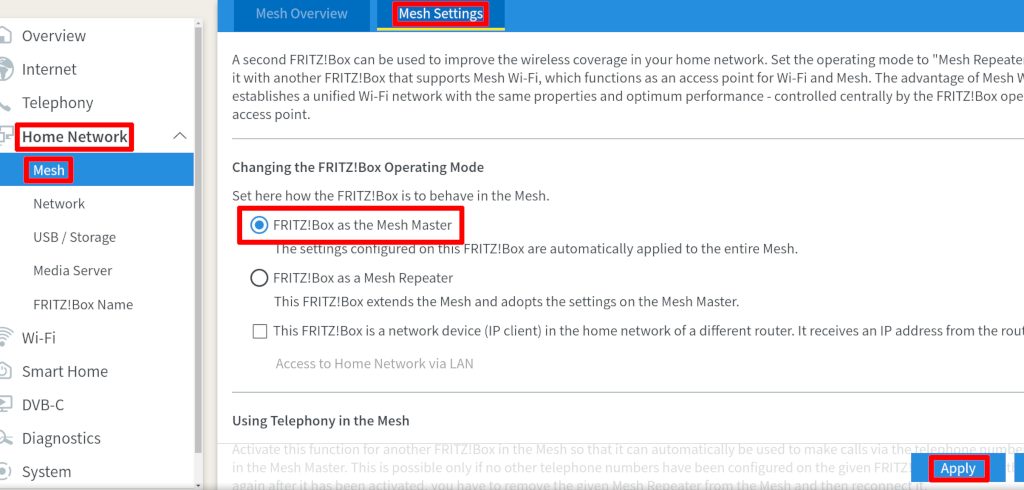
- Go back to the same page again and verify that the settings you made are still there.
Setting up the mesh repeater
- Connect a computer directly to the one of the mesh repeater’s LAN ports.
- Configure the computer (or mobile phone) to use IP address 169.254.1.2 (this is a link-local address) with netmask 255.255.0.0. If you must set a default gateway and/or DNS server then use 169.254.1.1 and 8.8.8.8, respectively.
- Connect to the mesh repeater at https://169.254.1.1/ (169.254.1.1 is the emergency access IP on the FRITZ!Box) and log in.
- Before you came to this website you had already messed up the settings (otherwise, why are you reading this page?). We need to get the mesh repeater into a clean state.
- Go to System –> Backup –> Factory Settings: click Load Factory Settings, as shown here:
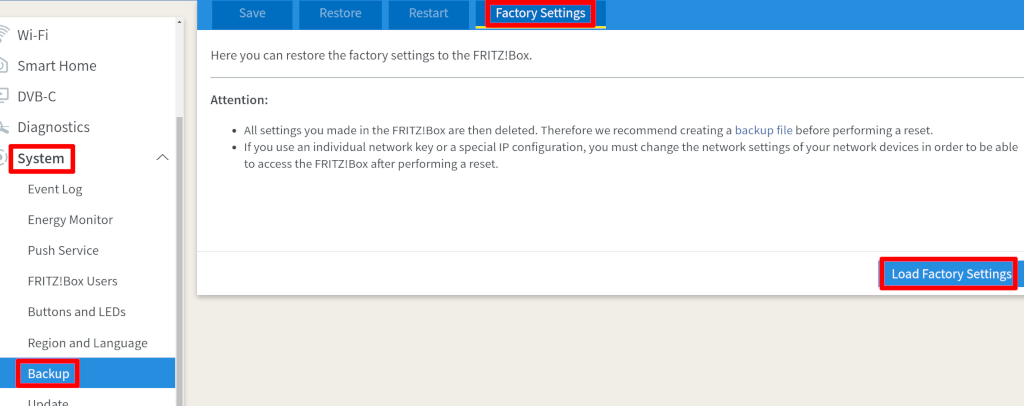
- Wait a couple of minutes for the mesh repeater to reboot.
- Connect to it again.
- Answer the initial questions about where you are and what language you want to use.
- Wait a couple of minutes for ther mesh repeater to reboot again.
- Connect to the mesh repeater again and log in using the default password, which is on the underside of the mesh repeater.
- Answer the initial questions about providing usage data to AVM.
- At this point, I found that the device showed some pages with German text even though I had configured it to use English.
- The mesh repeater presents a dialogue to configure the device; ignore this and open to the hamburger menu.
- Go to Home Network –> Network –> Network Settings: set the operating mode to IP client (this is a strange way of saying that the the mesh repeater does not have a direct connection to the internet); set the method by which the home network is access to LAN; set the static IP configuration (IP address, netmask, default gateway, which should be the mesh master’s IP address, DNS) and press Apply, as shown here:
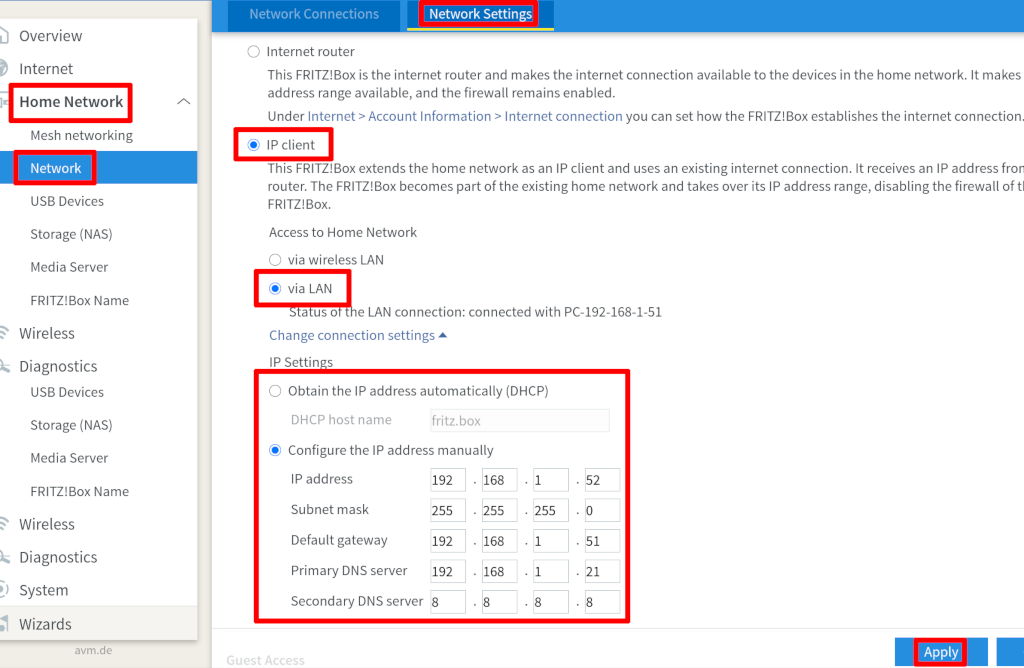
- Note that if you changed the IP address then you will need to allow time for the mesh repeater to reboot and that, after that, you will need to log in to the mesh master again but using its new IP address!
- Disconnect the computer from the mesh repeater.
- Connect the mesh repeater to the home network.
How it goes wrong
- On the mesh repeater go to Home Network –> Mesh Networking –> Access to Home Network, as shown here:
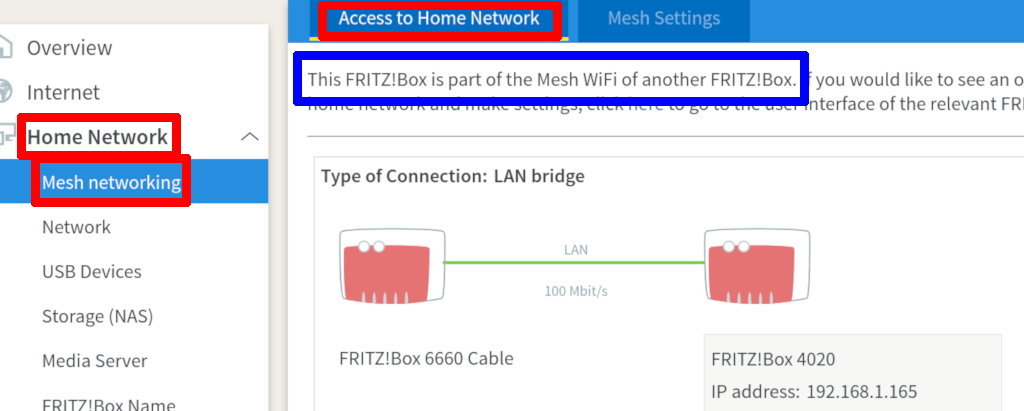
and note that:- the mesh repeater believes it is part of a mesh (see blue square).
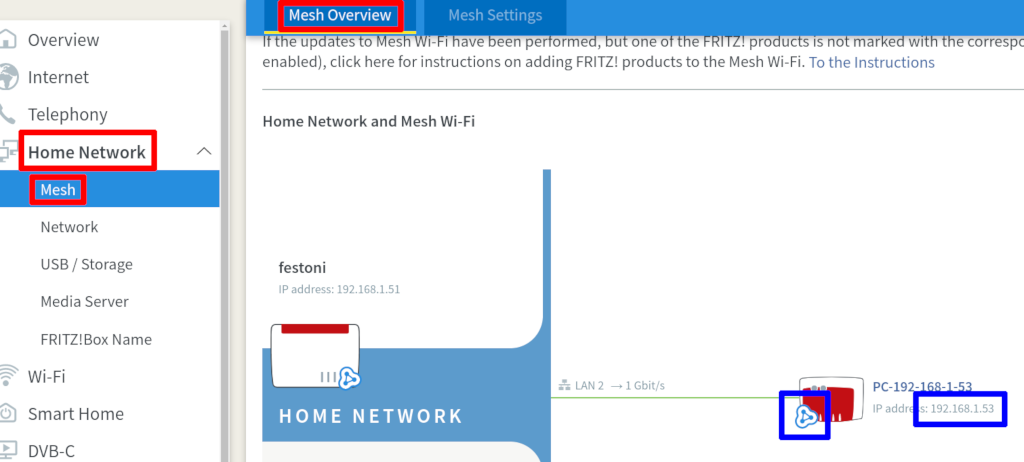
- On the mesh master go to Home Network –> Mesh –> Mesh Overview, as shown here:
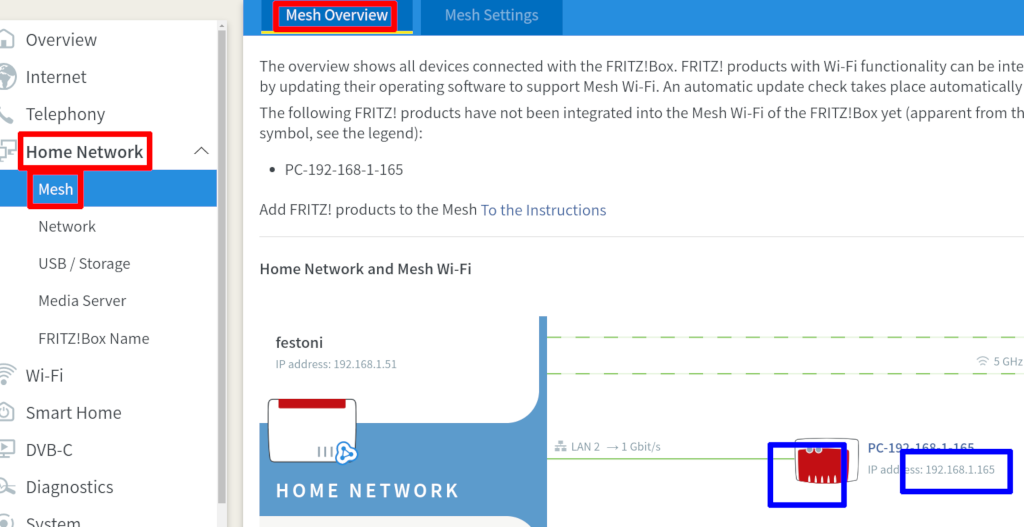 and note that:
- the mesh repeater has the wrong IP address (see right blue square)
- the mesh master believes that the mesh repeater is not part of the mesh (see missing mesh icon in left blue square)
How to correct it
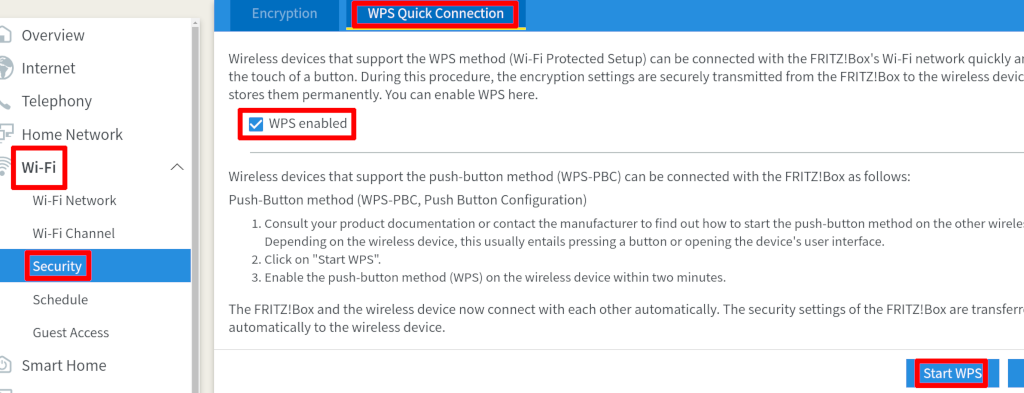
- On the mesh master go to WIFI –> Security –> WPS Quick Connect: make sure WPS is enabled, clicking Start WPS if necessary, as shown here:
- On the mesh repeater enable WPS as well (exactly as just done on the mesh master).
- Unplug the mesh repeater, wait a minute and plug it back in again.
- Be sure to read through the next few instructions before you do the first of them! The time it takes to complete them should be minimised!
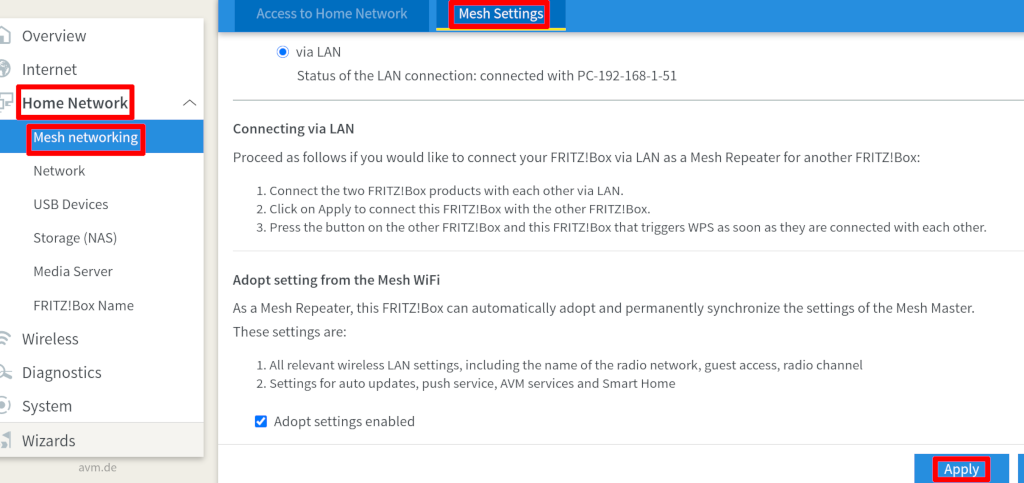
- On the mesh repeater go to Home Network –> Mesh Networking –> Mesh Settings: click Apply, as shown below:
- Go to the mesh master and press the WPS button.
- Go to the mesh repeater and press the WPS button.
- Wait a minute.
- On the mesh master go to Home Network –> Mesh –> Mesh Overview, as shown here:
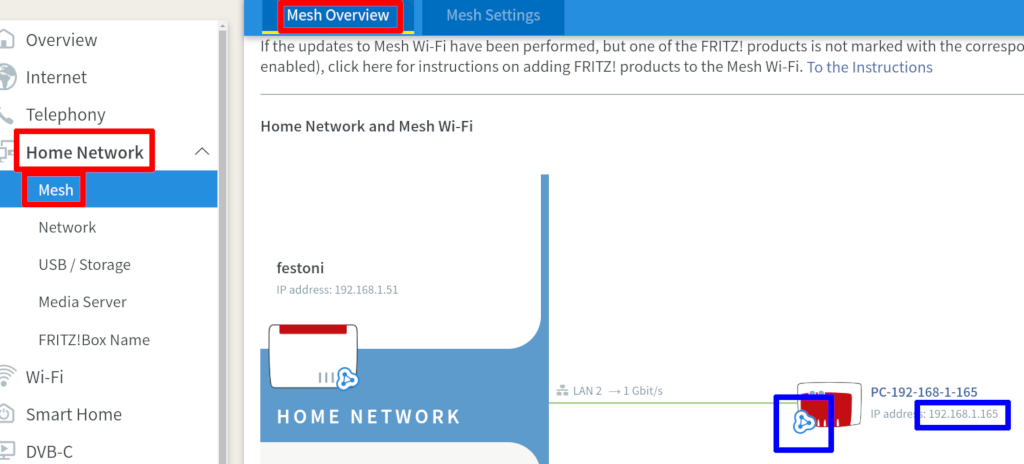
and note:- the mesh repeater still has the wrong IP address (see right blue square)
- the mesh master believes that the mesh repeater is now part of the mesh (see mesh icon in left blue square)
- If the mesh icon is not shown then don’t panic: the problem is probably due to not pressing the WPS buttons firmly enough or not pressing them both within a short enough time. I suggest:
- you consider that there are three places where something has to be done:
- on the computer we need press Apply (not yet!)
- on the mesh master we need to press WPS (not yet!)
- on the mesh repeater we need to press WPS (not yet!)
- you move the computer close to either the mesh master or the mesh repeater and you find the WPS button (but don’t press it yet!)
- get a second person to help you: they should go and stand next to the other device (i.e. the mesh repeater or the mesh master) and find the WPS button (but don’t press it yet!)
- you count out loud enough for the other person to hear: “5 … 4 … 3 …. 2 …. 1 … press!” and …
- … when you say “3” you press the Apply button and …
- … when you say “press!” then you both press the WPS button on your devices, pressing firmly and for about half a second.
- Then go back to step 8 above.
- If there is still no mesh icon then repeat; you cannot continue until the mesh icon is present.
- you consider that there are three places where something has to be done:
- Log in to the mesh client.
- Go to Home Network –> Network –> Network Settings and configure the static IP address and other network settings exactly as described above.
- Wait a minute.
- On the mesh master go to Home Network –> Mesh –> Mesh Overview, as shown here:
 and note:
- the mesh repeater now has the right IP address (see right blue square)
- the mesh master believes that the mesh repeater is part of the mesh (see mesh icon in left blue square)