
Introduction
This page describes how I set up my WordPress sites.
The short version:
- one frontend webserver running multiple name-based vhosts, with one IP address, but multiple LetsEncrypt-certified hostnames
- one (or more) backend webservers running multiple name-based vhosts, with one IP address (per webserver), but multiple snakeoil-certified hostnames
- each frontend name-based vhost proxies to one backend name-based vhost
- each backend name-based vhost serves one WordPress site
- everything is over https
like this:
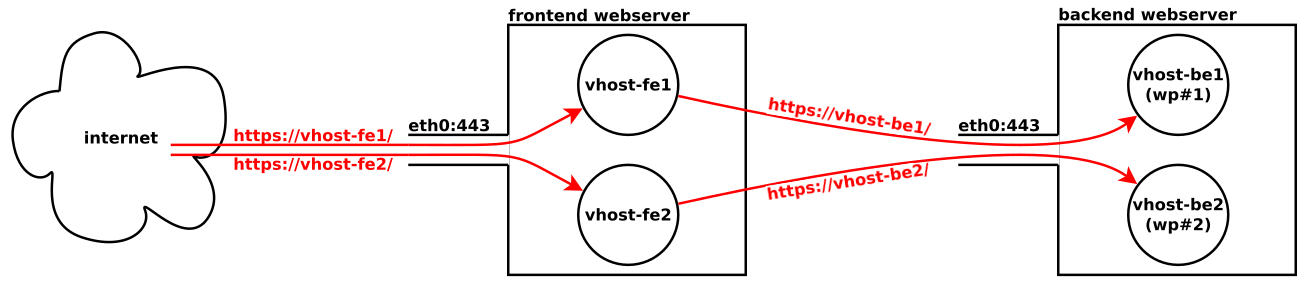
It can be seen that the frontend vhosts are named after the URLs by which they are accessed. “named after” means how apache config file is named, what ServerName is set to, how log files are named, how SSL certificates are named. For example, if a website is to be accessible at https://vhost-fe1.example.com/ then the frontend host will be vhost-fe1.example.com, meaning that the apache config file will be vhost-fe1.example.com.conf, ServerName will be set to vhost-fe1.example.com, the log files will be /var/log/apache2/vhost-fe1.example.com-error.log and /var/log/apache2/vhost-fe1.example.com-access.log, an SSL certificate must be created for vhost-fe1.example.com and will be stored in /etc/ssl/certs/ssl-cert-vhost-fe1.example.com.pem and /etc/ssl/private/ssl-cert-vhost-fe1.example.com.key.
It can also be seen that backend vhosts are named after the URLs by which they are accessed by the frontend vhost. For example, if a website is to be accessible at https://vhost-be1.some-private-network.net/ from the frontend vhost, then the backend host will be vhost-be1.some-private-network.net, meaning that the apache config file will be vhost-be1.some-private-network.net.conf, ServerName will be set to vhost-be1.some-private-network.net, the log files will be /var/log/apache2/vhost-be1.some-private-network.net-error.log and /var/log/apache2/vhost-be1.some-private-network.net-access.log, an SSL certificate must be created for vhost-be1.some-private-network.net and will be stored in /etc/ssl/certs/ssl-cert-vhost-be1.some-private-network.net.pem and /etc/ssl/private/ssl-cert-vhost-be1.some-private-network.net.
As an extension to this (and this is not shown in the diagram), the backend vhost may be named after the frontend vhost, but it’s important to see that it is nonetheless only on the backend network and that this has implications for its FQHN. For example, we cannot call the backend vhost vhost-be1.example.com, but we could call it vhost-be1examplecom.private-network.net. This procedure uses this extension.
Finally, note also that frontend certificates must be legitimate certificates (e.g. from LetsEncrypt), but backend certificates can be snakeoil.
Prologue
- The backend host should have at least 2GB RAM.
- On your local network’s DNS server, add a DNS entry for the backend host. E.g.:
ditalini# grep gramigne /etc/bind/*
/etc/bind/db.1.168.192:16                       IN  PTR   gramigne.pasta.net.
/etc/bind/db.pasta.net:gramigne                 IN  A     192.168.1.16
ditalini#
- On the backend host, delete the snakeoil certificate (we will generate vhost-specific snakeoil certificates later):
rm /etc/ssl/private/ssl-cert-snakeoil.key /etc/ssl/certs/ssl-cert-snakeoil.pem
Basic installation
- On the backend host, run:
apt-get install wordpress mariadb-server apache2
- On the backend host, convert the pre-existing wp-content directory into a template:
mkdir /var/lib/wordpress/empty-template
mv /var/lib/wordpress/wp-content /var/lib/wordpress/empty-template/wp-content
- On the backend host, edit /etc/php/7.0/apache2/php.ini and set:
post_max_size = 201M
upload_max_filesize = 202M
(These values are deliberately slightly different so that error messages regarding hit limits can associated to the applicable variable.)
- On the backend host, replace /etc/wordpress/htaccess with a text file containing one big comment:
# This file is redundant! Access to and execution of wordpress content and scripts in
# /usr/share/wordpress/ *was* governed by the .htaccess file in that directory. That
# *single* location is obviously no good for multisite setups (which is all that
# htaccess file is used to store).
#
# In fact that file is acually a symlink to /etc/wordpress/htaccess (which is this
# file), which is obviously still no good for multisite setups.
#
# Apache docs ( https://httpd.apache.org/docs/2.4/howto/htaccess.html#when ) say:
#
# In general, you should only use .htaccess files when you
# don't have access to the main server configuration file.
#
# So, we just put the config directly in the server config. Unfortunately that means
# that WordPress can't write the rewrite rules for permalinks itself, but that's ok.
- On the backend host, run:
a2enmod ssl rewrite
Per-wordpress site configuration
Prologue
- In this section, commands will reference shell variables, so these need to be set:
FE_VHOST=<frontend-vhost>                        #  e.g. FE_VHOST=www.pasta.freemyip.com
BE_FQHN=<backend-fully-qualified-hostname>       #  e.g. BE_FQHN=gramigne.pasta.net
DATABASE_PASSWORD=<set-a-password>               #  e.g. DATABASE_PASSWORD=opensesame
- Additional variables are derived as follows:
DOTLESS_FE_VHOST=${FE_VHOST//./} BE_UQHN=${BE_FQHN%%.*} BE_DN=${BE_FQHN#*.} BE_VHOST=$BE_UQHN-$DOTLESS_FE_VHOST.$BE_DN DATABASE_NAME=$DOTLESS_FE_VHOST # MySQL/MariaDB doesn't like '.' in db name ... DATABASE_USER=$DOTLESS_FE_VHOST # ... or db user. - Note that these variables will be needed on the frontend webserver, the backend webserver and the DNS server.
- Note also that in this section, file contents will contain then non-dollar-prefixed variable names in the files as placeholders for the corresponding values. These will then need to be substituted, but the instructions below will explain how.
DNS
- On your local network’s DNS server, add a DNS entry for the backend vhost E.g.:
ditalini# grep ${BE_VHOST%%.*} /etc/bind/*
/etc/bind/db.pasta.net:gramigne-wwwpastafreemyipcom IN A 192.168.1.16
ditalini#
Snakeoil certificate
- On the backend host, generate a snakeoil certificate for the backend vhost:
openssl req -new -x509 -nodes -out /etc/ssl/certs/ssl-cert-snakeoil-$BE_VHOST.pem \
    -keyout /etc/ssl/private/ssl-cert-snakeoil-$BE_VHOST.key \
    -days 3650 -subj "/CN=$BE_VHOST"
c_rehash
Apache
- On the backend host, add a site config file in /etc/apache2/sites-available/$BE_VHOST.conf:
<VirtualHost *:443>
    ServerName BE_VHOST
    DocumentRoot /usr/share/wordpress/
    DirectoryIndex index.php index.html
    ErrorLog ${APACHE_LOG_DIR}/BE_VHOST-error.log
    CustomLog ${APACHE_LOG_DIR}/BE_VHOST-access.log combined
    LogLevel warn
    ServerSignature Off

    SSLEngine On
    SSLCertificateFile /etc/ssl/certs/ssl-cert-snakeoil-BE_VHOST.pem
    SSLCertificateKeyFile /etc/ssl/private/ssl-cert-snakeoil-BE_VHOST.key


    <Directory /usr/share/wordpress>
        Options FollowSymLinks
        AllowOverride Limit Options FileInfo
        Require all granted
        # BEGIN WordPress
        <IfModule mod_rewrite.c>
            RewriteEngine On
            RewriteBase /
            RewriteRule ^index\.php$ - [L]
            RewriteCond %{REQUEST_FILENAME} !-f
            RewriteCond %{REQUEST_FILENAME} !-d
            RewriteRule . /index.php [L]
        </IfModule>
        # END WordPress
    </Directory>

    Alias /wp-content /var/lib/wordpress/FE_VHOST/wp-content
    <Directory /var/lib/wordpress/FE_VHOST/wp-content>
        Options FollowSymLinks
        Require all granted
    </Directory>
</VirtualHost>
and make the necessary substitutions:
sed -i -e "s/FE_VHOST/$FE_VHOST/g" \ -e "s/BE_VHOST/$BE_VHOST/g" \ /etc/apache2/sites-available/$BE_VHOST.conf - On the backend host, run:
a2ensite $BE_VHOST
systemctl reload apache2
Database configuration for migrating a website
- On the backend host, create a database for the WordPress instance as follows:
mysql <<EOF
    create database $DATABASE_NAME;
    create user $DATABASE_USER@localhost identified by '$DATABASE_PASSWORD';
    grant all privileges on $DATABASE_NAME.* to $DATABASE_USER@localhost;
    flush privileges;
EOF
- On the old WordPress server, indentify the old database name and dump it to a file:
echo "show databases" | mysql
mysqldump --add-drop-table <database-name> > wordpress.sql
- Transfer the dump file from the old WordPress server, to the backend host.
- On the backend host, import the dump file into the new database:
mysql $DATABASE_NAME < wordpress.sql
(running mysql directly seemed more reliable than using mysqlimport)
- On the backend host, tell wordpress how to access its database by creating /etc/wordpress/config-$BE_VHOST.php containing:
<?php
define('DB_NAME', 'DATABASE_NAME');
define('DB_USER', 'DATABASE_USER');
define('DB_PASSWORD', 'DATABASE_PASSWORD');
define('DB_HOST', 'localhost');
define('WP_CONTENT_DIR', '/var/lib/wordpress/FE_VHOST/wp-content');
(note that it’s normal for there to be no PHP terminator at the bottom of this file) and make the necessary substitutions:
sed -i -e "s/DATABASE_NAME/$DATABASE_NAME/g" \
    -e "s/DATABASE_USER/$DATABASE_USER/g" \
    -e "s/DATABASE_PASSWORD/$DATABASE_PASSWORD/g" \
    -e "s/FE_VHOST/$FE_VHOST/g" \
    /etc/wordpress/config-$BE_VHOST.php
Database configuration for a new website
- On the backend host, create the database as above but do not make a dump or import it.
Content configuration for migrating a website
- On the backend host, create a directory for content:
mkdir -p /var/lib/wordpress/$FE_VHOST/wp-content
- Migrate the content over. E.g.:
ssh -n tirapasta "cd /var/lib/wordpress/wp-content && tar cf - ." | \
    ssh gramigne "cd /var/lib/wordpress/$FE_VHOST/wp-content && tar xf -"
Content Content configuration for a new website
- On the backend host run:
cp -ar /var/lib/wordpress/empty-template /var/lib/wordpress/$FE_VHOST
Initial setup for a new website
- Go to https://BE_VHOST/ and set:
- site title: <FE_VHOST>
- username: <a-suitable-login-for-yourself>
- password: <note-the-secure-default>
- your email address: <your-email-address>
- search engine visibility: <as-required>
and press ‘Install WordPress’.
- At the next screen click ‘Login’.
- At the next screen login.
- To allow plugins to be installed directly by WordPress (rather than the admin being asked how to ftp the plugin onto the WordPress server), edit /etc/wordpress/config-$BE_VHOST.php and add:
define('FS_METHOD', 'direct' ); - To install plugins either rsync the wp-content/plugins directory from another vhost’s directory and activate the plugins in the normal manner, or install the following plugins:
- ‘Disable Comments’ version 1.7.1 by Samir Shah
- ‘Hide Title’ version 1.0.4 by Brandon Kraft & Randall Runnels
- ‘Just Writing’ version 3.9 by Greg Ross
- ‘Justified Gallery’ version 1.3.0 by Damian Góra
- ‘Manage Upload Types’ version 1.3 by Jeremy Madea
- ‘Media Cleaner’ version 4.8.4 by Jordy Meow
- ‘Media File Manager’ version 1.4.2 by Atsushi Ueda
- ‘OSM’ version 4.1.1 by MiKa
- ‘PhotoSwipe Light’ version 4.1.1.1 by Louy Alakkad
- ‘TablePress’ version 1.7 by Tobias Bäthge
- ‘Velvet Blues Update URLs’ version 3.2.7 by VelvetBlues.com
- ‘W3 Total Cache’ version 0.9.7 by Frederick Townes
- ‘WordPress Importer’ version 0.6.4 by wordpressdotorg
- ‘WP Broken Link Status Checker’ version 1.0.4 by Pau Iglesias SeedPlugins
- To install themes either rsync the wp-content/themes directory from another vhost’s directory and activate the themes in the normal manner, or install the following themes:
- (currently none)
- For ‘W3 Cache Total’:
- Edit /etc/wordpress/config-$BE_VHOST.php and add:
define('WP_CACHE', true); - Disable the plugin and immediately reenable it; you should see a message like:
FTP credentials don't allow to write to file /usr/share/wordpress/.htaccess
W3 Total Cache Error: Files and directories could not be automatically created to complete the installation.
Please execute commands manually [View required changes]
- Click the button to view the required changes, copy the text and to /etc/apache2/sites-available/$BE_VHOST.conf.
- Run:
service apache2 reload
- Note that the message will continually appear at the top of the plugins page (because it’s checking the htaccess file, which we do not use in this configuration).
- Edit /etc/wordpress/config-$BE_VHOST.php and add:
- For ‘WP Link Status’:
- Run:
apt-get install php-curl
- Run:
- Go to Settings/General and set:
- Tagline: <empty>
- WordPress address: https://<FE_VHOST> (note that it defaults to https://<BE_VHOST>)
- Site address: https://<FE_VHOST> (note that it defaults to https://<BE_VHOST>)
- After saving these changes, the page redirects to a non-existent page. If the URL https://<BE_VHOST> is re-entered, then it displays, but the CSS is missing. This is all to be expected for the moment.
Testing #1
- Go to https://BE_VHOST/; the front page should work (although the SSL certificate will not be valid).
- Move the mouse over links on the front page; they should point to https://FE_VHOST (because that’s what the WordPress instance has been told to generate).
- Add an entry to /etc/hosts of your own desktop of the form:
$FE_VHOST $BE_IP_ADDR
and visit https://FE_VHOST; you should receive a message saying that config-$FE_VHOST.php does not exist.
- On the backend host, run:
mv /etc/wordpress/config-$BE_VHOST.php /etc/wordpress/config-$FE_VHOST.php
and visit https://FE_VHOST/; the should be no message saying that config-$FE_VHOST.php does not exist and the CSS should be correct.
- Undo the changes made in this section (yes, even though it breaks CSS again).
Proxy setup
- Obtain a legitimate SSL certificate for FE_VHOST (maybe see Setting up LetsEncrypt).
- On the frontend host, edit /etc/apache2/sites-available/$FE_VHOST-ssl.conf containing:
<IfModule mod_ssl.c>
    <VirtualHost *:443>
    ServerName FE_VHOST
    ServerAdmin webmaster@dont-use-this-address
    CustomLog /var/log/apache2/FE_VHOST-access.log combined2
    ErrorLog /var/log/apache2/FE_VHOST-error.log
    LogLevel warn
    ServerSignature Off
    Include /etc/letsencrypt/options-ssl-apache.conf
    #  If not usinf LetsEncrypt then fix paths below.
    SSLCertificateFile /etc/letsencrypt/live/FE_VHOST/fullchain.pem
    SSLCertificateKeyFile /etc/letsencrypt/live/FE_VHOST/privkey.pem

    SSLProxyEngine on
    ProxyPass / https://BE_VHOST/
    ProxyPassReverse / https://BE_VHOST/
</VirtualHost>
</IfModule>
and make the necessary substitutions:
sed -i -e "s/FE_VHOST/$FE_VHOST/g" \ -e "s/BE_VHOST/$BE_VHOST/g" \ /etc/apache2/sites-available/$FE_VHOST-ssl.conf - Redirect http traffic to https by editing /etc/apache2/sites-available/$FE_VHOST.conf to contain:
LogFormat "%h (%a) %l %u %t \"%r\" %>s %O \"%{Referer}i\" \"%{User-Agent}i\"" combined2 <VirtualHost *:80> ServerName FE_VHOST RedirectMatch permanent /(.*) https://FE_VHOST/$1 </VirtualHost> - and make the necessary substitutions:
sed -i -e "s/FE_VHOST/$FE_VHOST/g" \ /etc/apache2/sites-available/$FE_VHOST.conf - On the frontend host, run:
a2ensite $FE_VHOST-ssl
a2ensite $FE_VHOST
systemctl reload apache2
Testing #2
- Visit https://$FE_HOST/; everything should work (including CSS and SSL certificate).
Troubleshooting
Blank non-wordpress page
- Check mod_rewrite enabled
- Check you added the wp-generated stanza to /etc/apache2/sites-enabled/sitename (not any htaccess-ish file).
Badly encoded characters in web pages
- (this may be redundant) Check the old DB’s encoding and create the dump and new one to match:
mysql
show variables like "collation_set_database";
show variables like "collation_database";
mysqldump --default-character-set=latin1 --add-drop-table <database-name> > dumpfile.sql
# loading done as before
- Add to /etc/wordpress/sitename.php:
define('DB_CHARSET', 'latin1');
define('DB_COLLATE', 'latin1');
Empty visual editor panel and missing editor buttons
I had this at the beginning but not at the end so I didn’t investigate further.
Of two vhosts, one works but the other gets SSL proxy errors
- Direct your browser at the backend (e.g. https://$BE_VHOST) and check the SSL certificate is the correct one.
- Repeat for the second host.
- If both are getting the same certificate then it may be because the ServerNames in both backend vhosts are set to the frontend names.
Reddle theme fixes
- On the backend, edit /var/lib/wordpress/$FE_HOST/wp-content/themes/reddle/functions.php (remember WordPress site directories on the backend are named after the frontend site) and in the function reddle_wp_title() add this:
function reddle_wp_title( $title, $sep ) {
    global $page, $paged;

    // Added by Alexis to simplify page title to make it look nicer in Google search results.
    return explode($sep, $title)[0];
Pages are totally blank, page sources are blank, but there are no errors
- No themes are installed! Install one.