Introduction
This page describes how Alexis Huxley installs Windows XP on a KVM VM, but much of it applies also to installation on real hardware.
Some of this procedure (particularly the part related to VirtIO drivers) may seem over cautious, but I had a lot of problems getting the drivers working correctly (following difference procedures on the web, using different versions of the VirtIO drivers, installing them at different times in the installation procedure, allowing or not allowing Windows to select the best driver). What is below is what worked for me.
Media required
The following are required:
- Windows XP CD or ISO image (with license key)
- VirtIO drivers ISO image (in case that link stops working you can also get it here; if you want to use a newer version then beware of bug 1274048)
VM hardware
The VM hardware is as default except as noted below:
- set the hard disk to be size 16GB with IDE interface
- do not create a second hard disk at this time
- remove all NICs (during installation, Windows will assign the name ‘Local Area Connection’ to the virtual NIC. When this is later switched to VirtIO then that will be assigned the name ‘Local Area Connection 2’, which looks ugly. Therefore remove all NICs; we will add a VirtIO NIC when later)
- remove the console (it is not needed)
- set RAM to minimum 2GB (Windows XP is greedy)
- set the CD to the first boot device (when doing an initial installation from CD then the CD should automatically be set to be the first boot device, but if reinstalling then you may need to set this manually)
- set the video to QXL
Installing minimal OS
- Set the boot order to: CD, hard disk.
- Boot the Windows XP CD
- Complete the OS installation, entering sensible values (e.g. timezone) when required.
- Don’t panic if, after the first of several reboots, you see this:

Eventually the installation will complete.
Post installation
- Set the boot order to hard disk, CD.
- Convert the disk interface from IDE to VirtIO according to the following procedure:
- Shut down the VM.
- Create and a new small hard disk with VirtIO interface.
- Connect the VirtIO drivers ISO image.
- Boot the VM.
- The ‘New Hardware Wizard’ should open automatically.
- At the ‘Found New Hardware Wizard’ window, when prompted ‘Can Windows connect to Windows Update …’, select ‘No, not at this time’ and click ‘Next’.
- At the ‘Found New Hardware Wizard’ window, when prompted ‘What do you want the wizard to do?’, select ‘Install from a list or specific location (Advanced)’ and click ‘Next’.
- At the ‘Found New Hardware Wizard’ window, when prompted ‘Please choose your search and installation options’, select ‘Don’t search. I will choose the driver to install’ and click ‘Next’.
- At the ‘Found New Hardware Wizard’ window, when prompted ‘Select the device driver you want to install for this hardware’, click ‘Have Disk …’.
- At the ‘Install From Disk’ window, when prompted ‘Insert the manufacturer’s disk …’, click ‘Browse’, navigate your way D:\viostor\xp\x86 and click ‘OK’ to dismiss the ‘Install From Disk’ window.
- Highlight ‘Red Hat VirtIO SCSI controller’ and click ‘Next’.
- At the ‘Hardware Installation’ window, when prompted ‘The software you are installing … has not passed Windows Logo testing …’, click ‘Continue Anyway’.
- At the final ‘Found New Hardware Wizard’ window, click ‘Finish’.
- Some alert bubbles will appear informing you that the hard disk is ready to use.
- To confirm that the new small VirtIO disk really is accessible as follows:
- From the ‘Start’ menu, select ‘Run’ and enter:
diskpart
list disk
select disk 1
create partition primary
- Some alert bubbles will appear informing you that the volume is ready to use.
- Launch an explorer, right-click on ‘My Computer’, select ‘Manage’ and in the left pane click ‘Disk Management’.
- Scroll down to find the new disk, right-click on it and choose ‘Format’; at the ‘Format’ window, give the volume a name and check the ‘Perform a quick format’ box; at the warning window click ‘OK’.
- Scroll down to find the new disk, right-click on it and choose ‘Choose Drive Letter …’, then click ‘Add’ and ‘OK’.
- From the ‘Start’ menu, select ‘Run’ and enter:
- Reboot the VM.
- Launch am explorer, verify that the new disk is still listed.
- Shutdown the VM.
- Remove the new VirtIO hard disk.
- Boot the VM.
- Verify E: drive gone.
- Shutdown the VM.
- change the main disk to VirtIO.
- Boot the VM.
- Verify that it boots successfully and that no new hardware is detected.
- Disable automatic updates as follows:
- Click ‘Start’ and then ‘Run’ and then type:
services.msc
- Locate ‘Automatic Updates’ in the list of services and double-click it.
- In the ‘Startup type’ pulldown menu, select ‘Disabled’.
- In the ‘Service Status’ section, click ‘Stop’.
- Click ‘OK’.
- Click ‘Start’ and then ‘Run’ and then type:
- Set the screen resolution and depth to match your physical monitor. (This must be done now otherwise the ‘OK’ buttons in several dialogues below will not be clickable. Over a slow network connection this is almost impossible to do because the screen has not finished redrawing before the 15s timer expires and resolution reverts to 640×480.)
- Add and configure a NIC as follows:
- Shut down the VM.
- Add a NIC with VirtIO interface.
- Boot the VM.
- The ‘New Hardware Wizard’ should open automatically.
- At the ‘Found New Hardware Wizard’ window, when prompted ‘Can Windows connect to Windows Update …’, select ‘No, not at this time’ and click ‘Next’.
- At the ‘Found New Hardware Wizard’ window, when prompted ‘What do you want the wizard to do?’, select ‘Install from a list or specific location (Advanced)’ and click ‘Next’.
- At the ‘Found New Hardware Wizard’ window, when prompted ‘Please choose your search and installation options’, select ‘Don’t search. I will choose the driver to install’ and click ‘Next’.
- At the ‘Found New Hardware Wizard’ window, when prompted ‘Select the device driver you want to install for this hardware’, click ‘Next’ (there is no ‘Have Disk …’ button).
- At the ‘Found New Hardware Wizard’ window, when prompted ‘Hardware Type’, highlight ‘Network adapters’ and click ‘Next’.
- At the ‘Found New Hardware Wizard’ window, when prompted ‘Which network adapter do you want to install … (Unable to find any drivers for this device)’, click ‘Have Disk …’.
- At the ‘Install From Disk’ window, when prompted ‘Insert the manufacturer’s disk …’, click ‘Browse’, navigate your way D:\NetKVM\xp\x86 and click ‘OK’ to dismiss the ‘Install From Disk’ window.
- Highlight ‘Red Hat VirtIO Ethernet Adapter’ and click ‘Next’.
- At the ‘Hardware Installation’ window, when prompted ‘The software you are installing … has not passed Windows Logo testing …’, click ‘Continue Anyway’.
- At the final ‘Found New Hardware Wizard’ window, click ‘Finish’.
- Some alert bubbles will appear informing you that the hard disk is ready to use.
- Ensure the hostname is added to DNS (or the MAC address to the DHCP server configuration).
- From the ‘Start’ menu, go to ‘Control Panel’, then ‘Switch to Classic View’, then ‘Network Connections’, then right-click on ‘Local Area Connection’ and select ‘Properties’,
- On the ‘General’ tab, highlight ‘Internet Protocol (TCP/IP)’, click ‘Properties’ and then set the IP configuration as required, clicking ‘OK’ to finish the IP configuration.
- On the ‘Advanced’ tab, in the ‘Windows Firewall’ section (the only section), click ‘Settings’; the Windows Firewall window opens.
- On its ‘Advanced’ tab, in the ‘ICMP’ section, click ‘Settings’, check the ‘Allow incoming echo request’ box and click ‘OK’.
- Finally, click ‘Close’ to apply all the settings.
- If the network drive server is using Samba then make sure that its ‘global’ section contains:
strict locking = no
Failure to set this will result in the error message:
The process cannot access the file because another
process has locked a portion of the file
- According to my personal taste, adjust the appearance as follows:
- In a file browser, navigate all the way up until you can see ‘My Computer’, right click it, select Properties –> Advanced –> Performance –> Settings –> Adjust for best performance
- Start control panel and:
- From the left panel, switch to the ‘classic’ view (it should already be this because of actions taken earlier, but we keep this here for consistency)
- From the tools menu, select ‘Folder options’ and set the ‘tasks’ to ‘use Windows classic folders’ (it should already be this because of …)
- Display –> Display Properties –> Themes –> Windows Classic
- Display –> Display Properties –> Desktop –> Background –> None
- Display –> Display Properties –> Desktop –> Color –> Black
- Display –> Display Properties –> Screensaver –> None
- Display –> Display Properties –> Appearance –> Color scheme –> Brick
- Display –> Display Properties –> Appearance –> Effects –> uncheck ‘Use the following transition effects …’
- Display –> Display Properties –> Appearance –> Advanced –> Desktop –> Black
- Display –> Display Properties –> Settings –> Color quality –> 24 bit
- Right click on the Start button, select ‘Properties’ and set:
- On the ‘Start Menu’ tab, select ‘Classic Start Menu’
- On the ‘Taskbar’ tab, uncheck ‘Group similar taskbar buttons’, uncheck ‘Show the clock’, uncheck ‘Hide inactive icons’ and click ‘OK’.
- Right click on the desktop, go to ‘Arrange Icons By’ and uncheck ‘Show Desktop Icons’.
- Repeat the first step of this sub-procedure (i.e. verify that settings are still adjusted for best performance)
- Arrange start menus as preferred (including merging Administrator’s into All Users)
- In control panel, go to ‘User Accounts’ and:
- Click ‘Change the way users log on and off’, uncheck ‘Use the Welcome screen’ (without this it is impossible to log in as the administrator again) and click ‘Apply Options’.
- Create an account for yourself, log out as admin (painfully slow over VNC because of desktop fading; how can I disable that?!), log in as yourself, repeat the appearance related step above.
- Map network drives so as to be able to get access to the software archive.
- Install the following software in the following order:
- TightVNCserver and dfmirage (helps TightVNCserver)
(Note that at this point, you can reboot the machine and connect to it over VNC, which, if the machine is a VM, is a lot more comfortable.) - ClamWin and prerequisites Windows Imaging Component (WIC) and .NET (WIC first, then .NET, then ClamWin) and then disable Windows’ own security by:
- Click the shield icon in the system tray, in the Virus Protection section click ‘Recommendations’, check ‘I have an antivirus program …’ and then click ‘OK’ (note that the shield icon won’t disappear until the system is rebooted, which we do below)
- Click ‘Change the way Security Center alerts me’ and uncheck ‘Automatic Updates’ and ‘Virus Protection’.
- Java (from the Control Panel you can disable regular update checks)
- Firefox and:
- do an immediate update
- install Classic Theme Restorer
- install IKEA 3D kitchen designer
- NetTime (and disable software update checks and time refresh interval to 2 hours)
- WinZip (e.g. version 6.2)
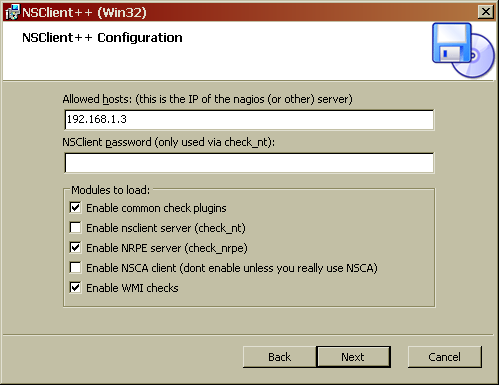
- NSClient++:
- Download it.
- Install it, entering the server IP address and enabling NRPE, as shown in this screeenshot:
- Stop the NSClient++ service (see newly added folder on Start menu).
- From the Start menu select ‘Run…’ and enter ‘cmd’ and click OK.
- In the command window, run:
cd "\Program Files"
cd "NSClient++"
nscp settings --generate --add-defaults --load-all
(Expect some errors about plugin libraries that could not be loaded.)
- Run:
notepad nsclient.ini
and add the following:
...
[/settings/NRPE/server]
...
allow arguments = 1
...
- Restart the service.
- On the Nagios/Icinga server, run a test as follows:
trennette# /usr/lib/nagios/plugins/check_nrpe \ -H <windows-ip-address> -p 5666 -c checkcpu -a warn=80% WARNING: 5m: average load 0%, 1m: average load 1%, 5s: average load 8%|'total 5m'=0%;0;90 'total 1m'=1%;0;90 'total 5s'=8%;0;90 trennette# - On the Nagios/Icinga server add suitable entries to the configuration. (My own configuration can be seen at https://svn.pasta.freemyip.com/main/nagiostools/trunk/icinga-objects/services.cfg.in.)
- Quite often XP generates event log entries that the ‘eventlog’ check displays like this:
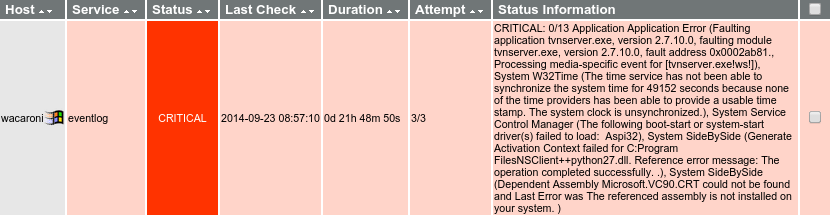
To clear these:- Go to Control Panel –> Administrative Tools –> Event Viewer
- For each of the log types Application, System and Security, right click on the log type and select ‘Clear All Events’; when prompted to save the logs say ‘No’.
- TightVNCserver and dfmirage (helps TightVNCserver)
- Optionally install the following software:
- IrfanView
- Evince
- LibreOffice
- CutePDF Writer and converter (that’s two programs to download; the converter is just Ghostscript)
- Netgear Powerline Universal Utility
Finalising the installation
- Reboot.
- Map any other network drives you need (e.g. Unix homes).
- Do a virus scan overnight. When I did this the following, which I believe (based on tcpdumps and earlier use of the same software) to be false positives, but I record them here in case it proves useful later on:
C:\Documents and Settings\Administrator\Local Settings\Application Data\{5C4AC4CE-7C1A-4A6D-A624-DE1EE46906D4}\NETGEAR Powerline Utility.msi: Win.Trojan.Agent-953862 FOUND
C:\Documents and Settings\Administrator\Local Settings\Temp\install\NETGEAR_Powerline_Setup_V3.1.0.4_230-10802-06.exe: Win.Trojan.Agent-953862 FOUND
C:\Program Files\Mozilla Firefox\webapp-uninstaller.exe: Win.Adware.Agent-59030 FOUND
C:\Program Files\NSClient++\modules\CheckDisk.dll: Win.Adware.Browsefox-12346 FOUND
C:\Program Files\NSClient++\modules\CheckEventLog.dll: Win.Adware.Browsefox-12347 FOUND
C:\Program Files\NSClient++\modules\CheckExternalScripts.dll: Win.Adware.Browsefox-12550 FOUND
C:\Program Files\NSClient++\modules\CheckHelpers.dll: Win.Adware.Browsefox-12535 FOUND
C:\Program Files\NSClient++\modules\CheckLogFile.dll: Win.Adware.Browsefox-12346 FOUND
C:\Program Files\NSClient++\modules\CheckNSCP.dll: Win.Adware.Browsefox-12535 FOUND
C:\Program Files\NSClient++\modules\CheckSystem.dll: Win.Adware.Browsefox-12535 FOUND
C:\Program Files\NSClient++\modules\CheckTaskSched.dll: Win.Adware.Browsefox-12535 FOUND
C:\Program Files\NSClient++\modules\CheckWMI.dll: Win.Adware.Browsefox-12535 FOUND
C:\Program Files\NSClient++\modules\check_nrpe.dll: Win.Adware.Browsefox-12346 FOUND
C:\Program Files\NSClient++\modules\GraphiteClient.dll: Win.Adware.Browsefox-12535 FOUND
C:\Program Files\NSClient++\modules\LUAScript.dll: Win.Adware.Browsefox-12346 FOUND
C:\Program Files\NSClient++\modules\NRDPClient.dll: Win.Adware.Browsefox-12346 FOUND
C:\Program Files\NSClient++\modules\NRPEClient.dll: Win.Adware.Browsefox-12346 FOUND
C:\Program Files\NSClient++\modules\NRPEServer.dll: Win.Adware.Browsefox-12346 FOUND
C:\Program Files\NSClient++\modules\NSCAClient.dll: Win.Adware.Browsefox-12346 FOUND
C:\Program Files\NSClient++\modules\NSCAServer.dll: Win.Adware.Browsefox-12346 FOUND
C:\Program Files\NSClient++\modules\NSClientServer.dll: Win.Adware.Browsefox-12346 FOUND
C:\Program Files\NSClient++\modules\PythonScript.dll: Win.Adware.Browsefox-12550 FOUND
C:\Program Files\NSClient++\modules\Scheduler.dll: Win.Adware.Browsefox-12550 FOUND
C:\Program Files\NSClient++\modules\SimpleCache.dll: Win.Adware.Browsefox-12535 FOUND
C:\Program Files\NSClient++\modules\SimpleFileWriter.dll: Win.Adware.Browsefox-12346 FOUND
C:\Program Files\NSClient++\modules\SMTPClient.dll: Win.Adware.Browsefox-12550 FOUND
C:\Program Files\NSClient++\modules\SyslogClient.dll: Win.Adware.Browsefox-12535 FOUND
C:\Program Files\NSClient++\nscp.exe: Win.Adware.Browsefox-12346 FOUND
C:\Program Files\NSClient++\reporter.exe: Win.Adware.Browsefox-12346 FOUND
C:\WINDOWS\Installer\14e179.msi: Win.Trojan.Agent-953862 FOUND
C:\WINDOWS\Installer\1b54d.msi: Win.Adware.Browsefox-12346 FOUND
C:\WINDOWS\Installer\{22AA0EE9-AC9A-4D08-A055-93E4E9DEEBDD}\nscp.exe: Win.Adware.Browsefox-12346 FOUND
But see this bug report before you start uninstalling NSClient++.
- Shutdown, freeze, boot.
- If the system is a VM then run the following command on the VM server to monitor the VM’s traffic. E.g.:
torchio# tcpdump -ni br0 ip and src 192.168.1.24 and not dst net 192.168.1.0/24 and not dst net 192.168.2.0/24 and not dst 224.0.0.22
I saw connections to:
96.181.34.216.in-addr.arpa domain name pointer projects.sourceforge.net.
Other drivers …
Improvements for next time
- Use a different dot net package that does not download components from the internet