
Introduction
This page describes how Judith Everett can scan pictures into GIMP.
Procedure
- Click on the Start button, start ‘GIMP’; note how there are two windows displayed:
- the GIMP main window (entitled ‘GNU Image Manipulation Program’)
- the GIMP toolbox window (entitled ‘Toolbox’)
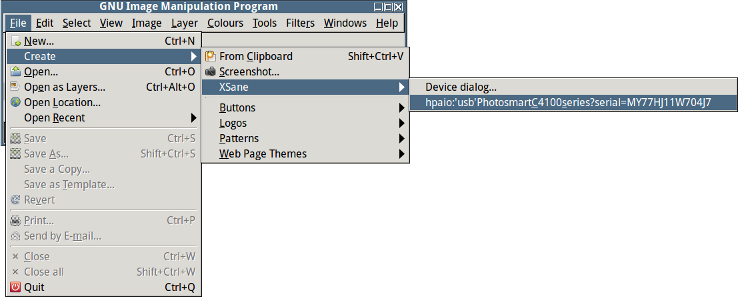
- Once GIMP starts, go to the File menu, then Create, then Xsane, then choose the entry that corresponds to the scanner device, as shown in the following diagram:
- Verify that now four windows are displayed:
- the GIMP main window (entitled ‘GNU Image Manipulation Program’)
- the GIMP toolbox window (entitled ‘Toolbox’)
- the Xsane scanner window (entitled ‘Xsane …’)
- the Xsane preview window (entitled ‘Preview …’)
If the Xsane scanner window is displayed but not the Xsane preview window then this is because last time you used Xsane you closed the Xsane preview window and Xsane has remember this setting; you can get it back by, in the Xsane scanner window, go to the ‘Window’ menu and select ‘Show preview’.
- In the Xsane preview window, click ‘Acquire preview’ and wait for the preview image to appear.
- In the Xsane preview window, use the mouse to select a rectangle from the preview; you should see that the selection’s position and size are displayed at the bottom of the Xsane scanner window.
- In the Xsane scanner window, click ‘Scan’; wait a couple of minutes for a new window containing an image of the selected area to appear.
- At this point scanning has been completed and the image has been aquired, so close the Xsane scanner window. (Do not close the Xsane preview window yourself; it will be closed automatically when you close the Xsane scanner window. If you close it yourself it will not open automatically next time!) This leaves open:
- the GIMP toolbox window
- the image window (entitled ‘Untitled …’)