
What can movie-monitor do?
- work around Debian BTS#684478
- work around Ubuntu bug 648555
- work around Ubuntu bug 570949
- work around Bildschirm wird während der Video-Wiedergabe schwarz (german)
What is DPMS?
DPMS is low-level facility for putting the monitor into standby/suspend/off state. The DPMS attributes are:
- enabled/disabled
- standby timeout
- suspend timeout
- power off timeout
Several programs can change the values of these attributes. Amongst these are:
- xscreensaver
- light-locker
- XFCE power manager
- the X server’s configuration files (probably only if you yourself modified the files to enable DPMS control)
By experimenting, I see that:
- DPMS operation is independent of xscreensaver and light-locker! Xscreensaver’s GUI and light-locker-settings allow changing the DPMS attributes but, once they are set, then the monitor will go off/suspend/standby even if xscreensaver and light-locker are not running! Again: DPMS is low-level facility; DPMS operation is independent of xscreensaver and light-locker.
- If you want the monitor to power off, then DPMS must be enabled and the power off timeout must be non-zero.
- In xscreensaver’s ‘Advanced’ tab, ‘Quick Power-off in Blank Only Mode’ is not greyed out when ‘Power Management Enabled’ is not ticked, but it should be! Again: If you want the monitor to power off, then DPMS must be enabled and the the power off timeout must be non-zero.
- The tooltip suggests that if ‘Quick Power-off in Blank Only Mode’ is enabled then the times are ignored and only this time is used, but this is not true. Again: DPMS is low-level facility; DPMS operation is independent of xscreensaver!
- xscreensaver-command can send a “reset your timer” message to xscreensaver; light-locker-command curreently cannot send a “reset your timer” message to light-locker.
Here are some other keywords for Google to chew on: xfce, xfce4, totem, screensaver, xscreensaver, disable, xset, standby, off, debian, ubuntu, solved, light-locker, light-locker-command, light-locker-settings.
Documentation
torchio$ movie-monitor --help
Usage:   movie-monitor [ <options> ]

Options: -v         | --verbose
         -d <level> | --debug=<level>
         -h         | --help
         -m <re>    | --re-movie=<re>
         -p <re>    | --re-player=<re>
                      --dpms={enabled|disabled}
torchio$
‘-m‘ allows you to specify a regular expression for movie files. The default covers files with common video file extensions and the DVD drive.
‘-p‘ allows you to specify a regular expression for movie players. The default covers all commands. This is safest, but has the side effect that, when the following command is run, movie-monitor would think it necessary to tell xscreensaver not to activate the screensaver because a movie was being watched:
torchio$ cat my-movie.avi > /dev/null
torchio$
(The same would apply to ‘cp’, ‘file’ or any other command that opens the video file for reading.)
‘–dpms=enabled‘ tells movie-monitor to regularly check that DPMS is enabled and if it is not enabled then to enable it. ‘–dpms=disabled‘ does the opposite. The default is that movie-monitor does not monitor DPMS settings. You should not need to use this unless some strange media player is changing the DPMS settings itself.
‘–debug=0‘ will show no messages; ‘–debug=1‘ will show also errors; ‘–debug=2‘ will show also warnings; ‘–debug=3′ will show also informational messages; higher values will show also debug messages. ‘–verbose‘ is equivalent to ‘–debug=3‘.
Installation
- Download movie-monitor by running:
wget https://svn.pasta.freemyip.com/main/smalltools/trunk/movie-monitor/bin/movie-monitor
- Make it executable by running:
chmod 755 movie-monitor
- Move it into a suitable directory in your $PATH. If you don’t know what that means then run:
mkdir -p ~/bin
mv movie-monitor ~/bin
for FILE in ~/.bash_profile ~/.profile; do
    [ ! -f $FILE ] || {
        echo 'PATH=$PATH:$HOME/bin' >> $FILE
        . $FILE
        break
    }
done
and, if, in order to make your X session manager see the modified PATH, you need to log out and back in again, then do so.
Configuration
- Run the XFCE settings manager, select ‘Session and Startup’ and go to the ‘Application Autostart’ tab, add movie-monitor as shown in this screenshot:

- Install xscreensaver.
- Uninstall light-locker and light-locker-settings.
- Get the session manager to start movie-monitor by logging out and back in again.
- Verify that movie-monitor is running, as in this example:
torchio$ ps fax | egrep '(movie-monitor)' | grep -v grep
24928 ?        S      0:00 /usr/bin/python /home/alexis/bin/pc017823/movie-monitor
torchio$
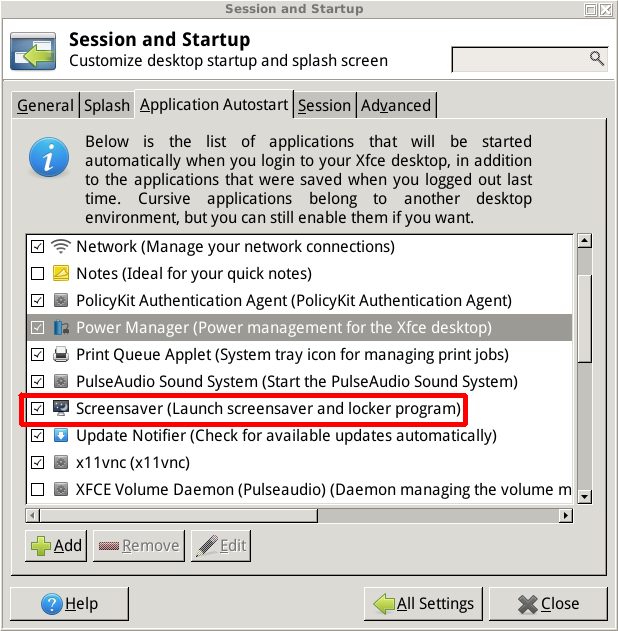
- Go to XFCE’s ‘Settings Manager’, go to ‘Session and Startup’ and in the ‘Application Autostart’ tab, ensure that ‘Screensaver’ is enabled, as in shown in this screenshot:
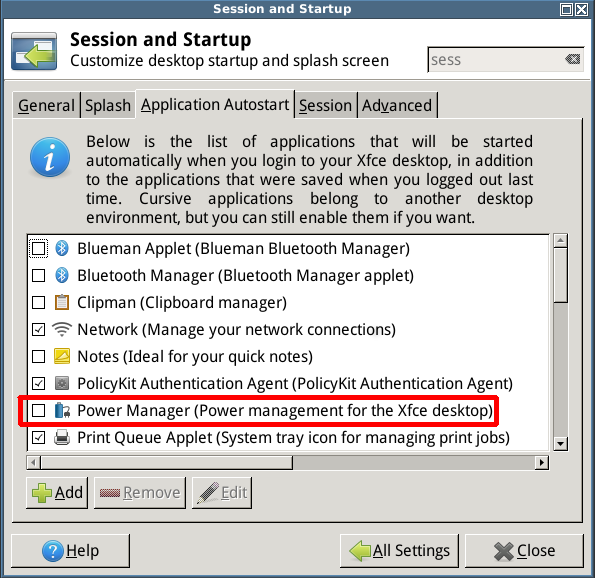
- Still in the ‘Application Autostart’ tab, ensure that ‘Power Manager’ is disabled, as in shown in this screenshot:
- Go to the ‘Session’ tab and kill ‘Power Manager’ if it is running, as shown in this screenshot:

- If you did just kill ‘Power Manager’, then you need to record a change in your session configuration, so that XFCE does not start it next time you log in. Do that as follows:
- Close any programs you don’t want to be recorded as being part of your session.
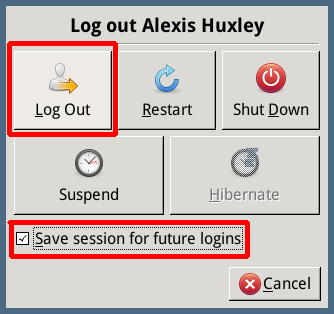
- Log out, enabling the saving of your session:
- Log back in.
- The logout dialogue will have remembered whether you enabled ‘Save session for future logins’. So if you don’t want your session to be saved by default when you log out in future, then log out and back in again, this time deliberately not saving the session; the logout dialogue will then remember that.
- Verify that power-manager is not running and that xscreensaver is running, as in this example:
torchio$ ps fax | egrep '(power-manager|xscreensaver)' | grep -v grep
24264 ?        S      0:00 xscreensaver -no-splash
torchio$
- Prevent DPMS from turning off the monitor while still allowing xscreensaver to turn off the monitor by ticking ‘Power Management Enabled’ but setting the three ‘Display Power Management’ timeouts to extremely high values as below:
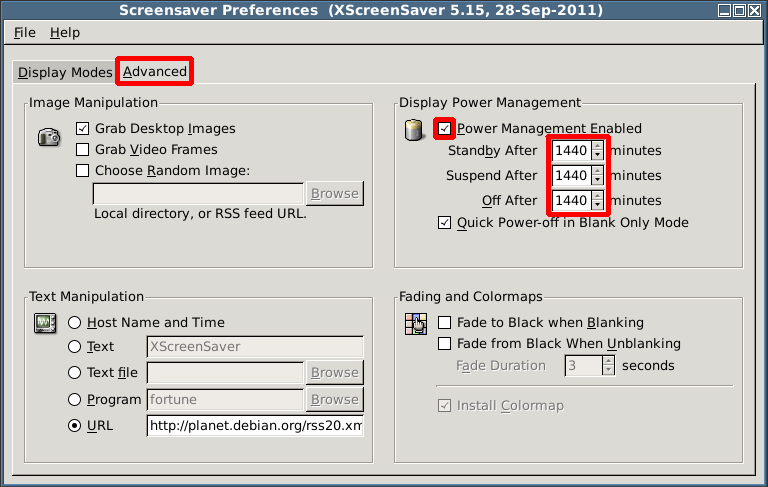
(1440 minutes is 1 day) - Verify the DPMS configuration has been applied in the example below:
torchio$ xset q | grep -A 2 DPMS
DPMS (Energy Star):
  Standby: 65535    Suspend: 65535    Off: 65535
  DPMS is Enabled
torchio$
- On xscreensaver’s ‘Advanced’ tab, tick ‘Quick Power-off in Blank Only Mode’.
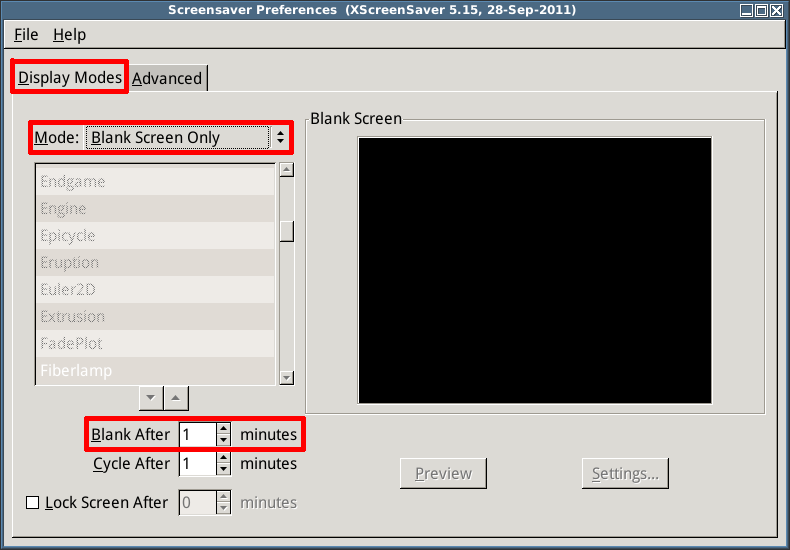
- On xscreensaver’s ‘Display Modes’ tab, set the mode to ‘Blank Screen Only’ and set the ‘Blank After’ time to suit your taste, as shown below:
Downloads
| version | released | version description | file | file description |
|---|---|---|---|---|
| svn-head | not released | latest development | movie-monitor | source |
Issues
If you find a bug please contact me. The following issues are known about and might be addressed in the future:
- no command line options to specify polling periods (added 23/12/2013)
- can’t detect streamed video data (e.g. youtube); anybody know how to determine this? (added 21/12/2013)
- buffering may mean that the end of the video file is read (and therefore the read offset is no longer increasing) some time before the media player has actually played (displayed) all the way to the end of the file (23/12/2013)
Copyright
Movie-monitor is (C) Alexis Huxley 2013-2024 and is distributed under the terms of the GPL.