
Introduction
This page describes how Alexis Huxley installed and configures a replicated storage server.
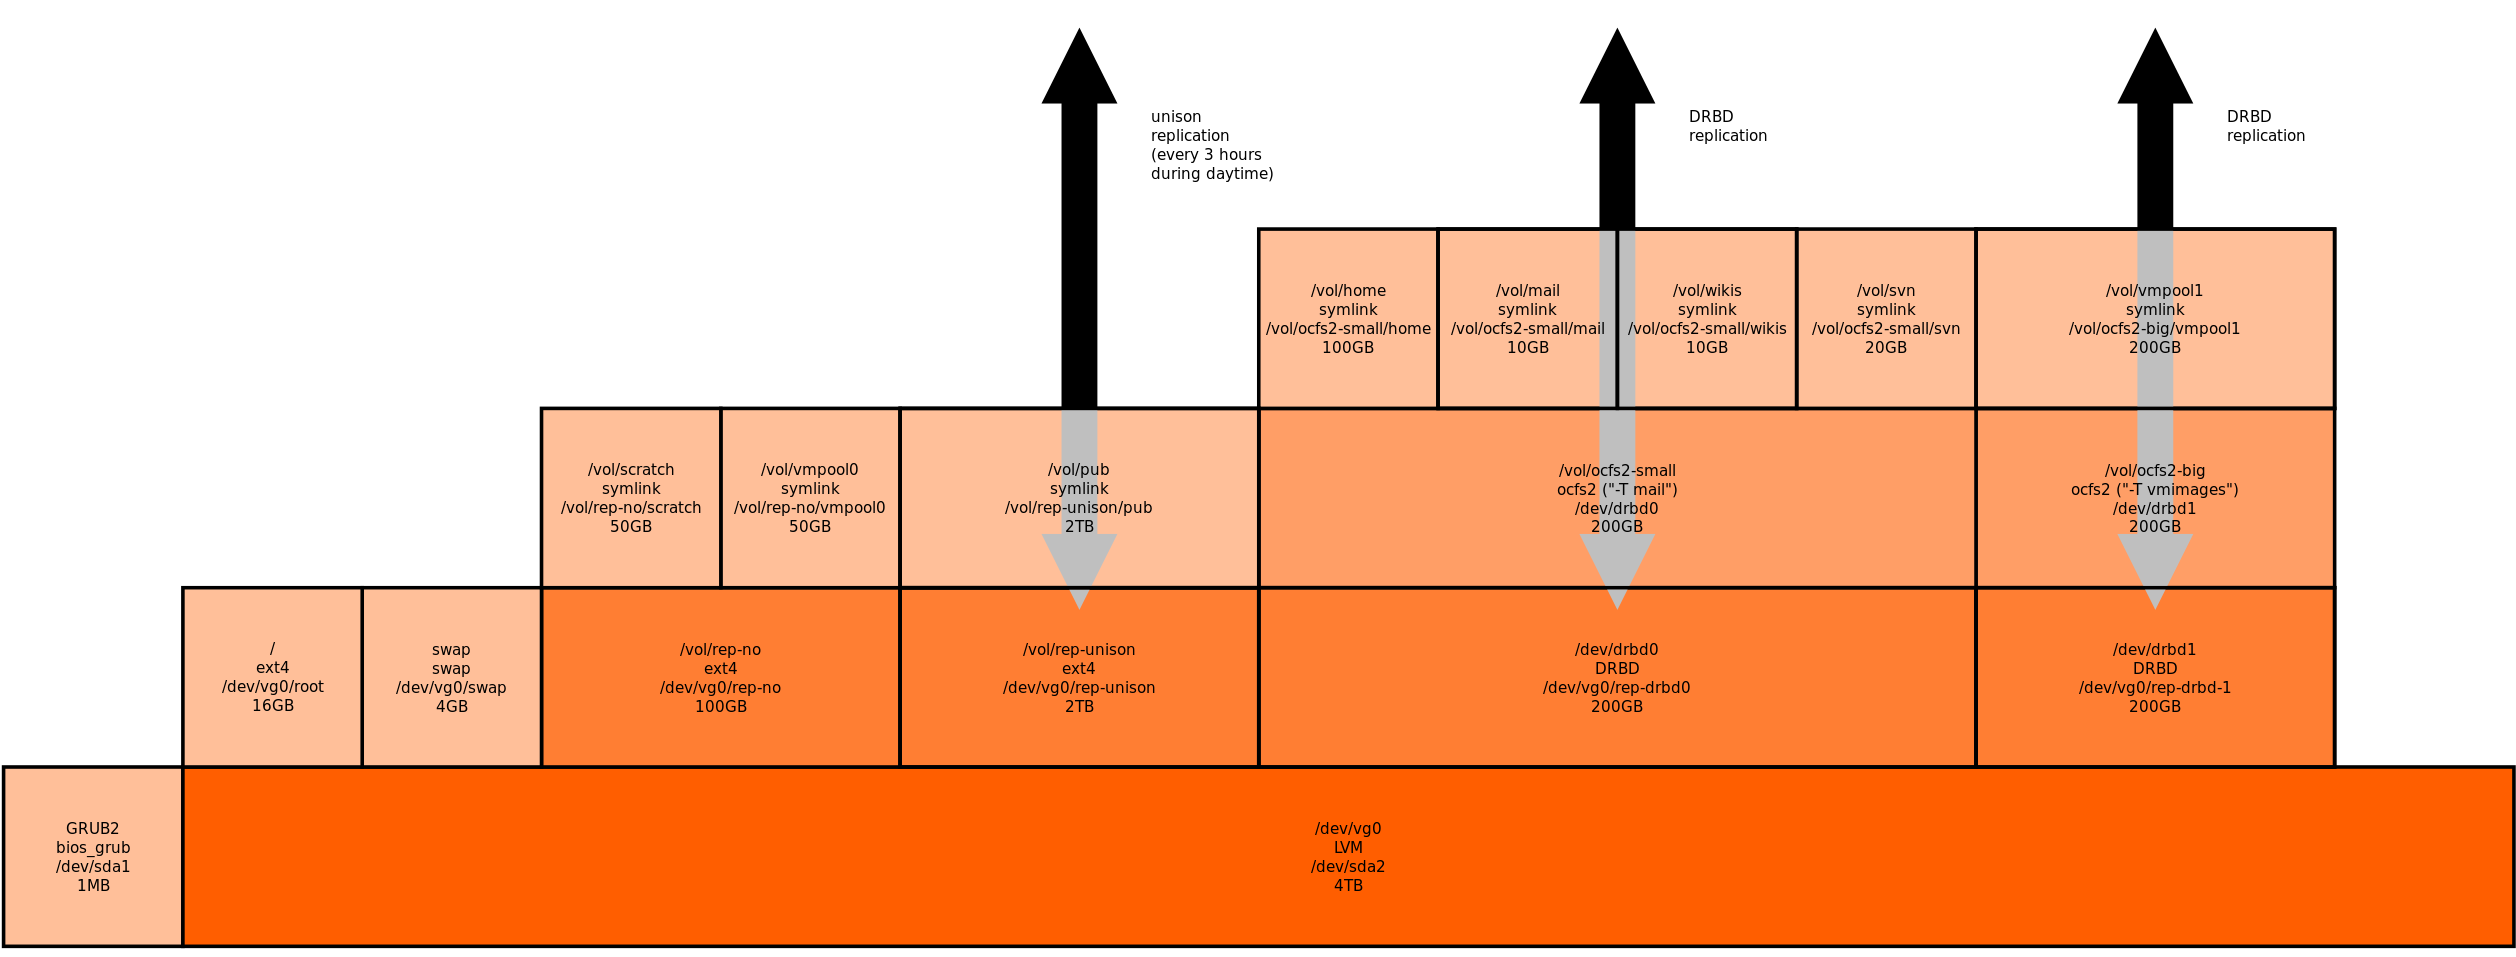
The configuration described here is one developed during preparation for my Debian Wheezy rollout. The disk layout is as described there; i.e.:
Note:
- two systems are configured in this manner, with replication of the indicated volumes via DRBD
- each system contains only one 4TB disk – there is no RAID – if a disk dies then reinstallation will be required, but data will not be lost
- data is shared out of subdirectories on relatively large volumes whose names (i.e. mountpoints) are derived from the underlying format of the volume (i.e. the device being mounted)
- server-side mountpoints more appropriate for advertising are presented to clients by using symlinks to the actual server-side mountpoints
- bidirectional replication of media files is done with unison, called from a cronjob
- replicated data is shared to other machines via NFS, unreplicated data is not shared
- replicated data is shared with the machine itself and the ‘other’ machine, by using OCFS2 filesystem on top of replicated devices
Pdi (part of MDI) partitions the disk using a preseeded partman recipe; so no action is required. It also creates LVs for root and swap. So all remaining space is available for storage volumes.
The commands and size below are derived from the diagram above.
Things to consider next time
This section is for the author to review before repeating this procedure.
- Create the libvirt-qemu user and group before installing any packages; this way I can force the same UID and GID across all OCFS2 cluster members, who will see the same files but otherwise disagree about who owns them, as illustrated here:
rotini# ssh fiori ls -ld /vol/vmpool2/trennette.img
-rw------- 1 vde2-net libvirt-qemu 16777216000 Jan  1 16:54 /vol/vmpool2/trennette.img
rotini# ssh torchio ls -ld /vol/vmpool2/trennette.img
-rw------- 1 libvirt-qemu libvirt-qemu 16777216000 Jan  1 16:54 /vol/vmpool2/trennette.img
rotini#
Prologue
- Run:
mkdir /vol
apt-get install drbd8-utils nfs-kernel-server ocfs2-tools
service drbd start
- If you are using secondary groups on NFS clients (i.e. users belong to more than just their login group), as in this example:
chifferi$ id
uid=1000(alexis) gid=1000(alexis) groups=1000(alexis),1001(multimedia-editors)
chifferi$
then you may encounter LP#409366 and you should run the following:
perl -pi -e 's/^(RPCMOUNTDOPTS=).*/$1/' /etc/default/nfs-kernel-server
service nfs-kernel-server restart
De-chicken-and-egging
The VM server currently depends on the DNS server VM; this dependency needs to be broken.
- Configure the system as a caching nameserver with no local referrer.
- Modify /etc/resolv.conf to contain only:
nameserver 127.0.0.1
(Do not be tempted to add a domain or a list of search domains!)
- Empty /etc/hosts of all but localhost, the host itself (without domain name) and other cluster nodes (also without domain name).
- Verify that the following works:
ping <other-cluster-node-by-name>
- Run:
apt-get update
If it fails with the error:
Err http://security.debian.org wheezy/updates Release.gpg
  Could not resolve 'security.debian.org'
then run:
service nscd restart
and try running apt-get again. (I encountered this on fideua and this procedure cleared it.)
If it fails with an error like this:Err <url> wheezy/non-free i386 Packages 406 Not Acceptable
then run:
cd /etc/apt/sources.list.d/
mkdir /etc/apt/sources.list.d/KEEP
mv /etc/apt/sources.list.d/*.list /etc/apt/sources.list.d/KEEP
for X in /etc/apt/sources.list.d/KEEP/*; do
    apt-get update > /dev/null 2>&1
    mv $X /etc/apt/sources.list.d/
done
and try running apt-get again. (I encountered this on gemelli and this procedure cleared it.)
- Edit /etc/postfix/main.cf, specify the local mail relay by IP address and run:
postfix reload
postqueue -f
- Edit /etc/apt/sources.list and /etc/apt/sources.list.d/*.list, specify the install server by IP address.
LVM
- Run:
lvcreate --name=rep-no     --size=100G vg0
lvcreate --name=rep-drbd0  --size=200G vg0
lvcreate --name=rep-drbd1  --size=200G vg0
lvcreate --name=rep-unison --size=2T   vg0
- At this stage the LVM configuration looks like this:
fiori# lvs
  LV         VG   Attr     LSize   Pool Origin Data%  Move Log Copy%  Convert
  rep-drbd0  vg0  -wi-a--- 200.00g
  rep-drbd1  vg0  -wi-a--- 200.00g
  rep-no     vg0  -wi-a--- 100.00g
  rep-unison vg0  -wi-a---   2.00t
  root       vg0  -wi-ao--  14.43g
  swap       vg0  -wi-ao--   3.72g
fiori# vgs
  VG   #PV #LV #SN Attr   VSize VFree
  vg0    1   6   0 wz--n- 3.64t 1.13t
fiori#
Unreplicated volumes
- Run:
mkdir /vol/rep-no
mkfs -t ext4 /dev/vg0/rep-no
echo "/dev/mapper/vg0-rep--no /vol/rep-no   ext4  noatime,nodiratime 0 2" >> /etc/fstab
mount -a
Unison-replicated volumes
- Run:
mkdir /vol/rep-unison
mkfs -t ext4 /dev/vg0/rep-unison
echo "/dev/mapper/vg0-rep--unison /vol/rep-unison ext4 noatime,nodiratime 0 2" >> /etc/fstab
mount -a
- Nominate one machine as the client and the other as the server.
- On the client run:
ssh-keygen -q -t dsa -N "" -f ~/.ssh/id_dsa_unison
cat ~/.ssh/id_dsa_unison.pub
- On the server append the just displayed key to ~/.ssh/authorized_keys.
- On the client run the following command and validate the output:
fiori# ssh -q -i ~/.ssh/id_dsa_unison -o StrictHostKeyChecking=no <server> echo OK
OK
fiori#
- On the client, create ~/.unison/vol-rep-unison.prf containing:
root = /vol/rep-unison/
root = ssh://fiori//vol/rep-unison/
sshargs = -i /root/.ssh/id_dsa_unison
owner = true
group = true
perms = -1
times = true
- Run the first sync manually by running:
unison vol-rep-unison
and follow the prompts.
- To automate the synchronisation:
- Edit ~/.unison/rep-unison.prf and add the following:
auto = true
batch = true
terse = true
confirmbigdel = true
fastcheck = true
prefer = newer
- Run:
echo '0 0 * * * root unison vol-rep-unison' > /etc/cron.d/unison
- Edit ~/.unison/rep-unison.prf and add the following:
- To rotate logs:
- Edit ~/.unison/rep-unison.prf and add:
logfile = /var/log/unison.log
- Run:
echo -e '/var/log/unison.log {n dailyn compressn rotate 28n}' > /etc/logrotate.d/unison
- Edit ~/.unison/rep-unison.prf and add:
DRBD
If both nodes are available at the same time, then the syncing time can be considerably reduced. If this is not possible, it is still possible to make a “one legged” cluster and introduce the “second leg” later, but then a full sync will run and must complete before the volume is available on the second node.
- On both systems, edit /etc/drbd.d/drbd0.res to contain:
resource drbd0 { protocol C; device /dev/drbd0 minor 0; meta-disk internal; disk /dev/mapper/vg0-rep--drbd0; net { allow-two-primaries; after-sb-0pri discard-zero-changes; after-sb-1pri discard-secondary; after-sb-2pri disconnect; } on fiori { address 192.168.1.6:7790; } on torchio { address 192.168.1.7:7790; } handlers { before-resync-target "/sbin/drbdsetup $DRBD_MINOR secondary"; split-brain "/usr/lib/drbd/notify-split-brain.sh root"; } } - If both systems’ empty LVs for DRBD are available at the same time, then the DRBD synchronisation can be avoided, by configuring the volumes according to the following sub-procedure:
- On both nodes run:
dd if=/dev/zero of=/dev/mapper/vg0-rep--drbd0 bs=64M
drbdadm -- --force create-md drbd0
drbdadm up drbd0
- On one node only run:
drbdadm -- --clear-bitmap new-current-uuid drbd0
- On both nodes run:
drbdadm primary drbd0
- On both nodes run:
- If only one node is initially available then a one-legged-and-then-later-two-legged configuration can be done according to the following sub-procedure:
- On the “first leg” (i.e. the currently available machine), run:
drbdadm create-md drbd0
drbdadm up drbd0
drbdadm -- --overwrite-data-of-peer primary drbd0
- Verify that the device is now primary:
fiori# cat /proc/drbd
  0:drbd0  WFConnection Primary/Unknown UpToDate/DUnknown C r----s
fiori#
- You may start OCFS2 configuration (see below); once the “second leg” becomes available then you can continue to the next step of this section.
- On the “second leg” run:
drbdadm create-md drbd0
drbdadm up drbd0
- Wait for synchronisation to complete; you can monitor it by running:
cat /proc/drbd
- Run:
drbdadm primary drbd0
- On the “first leg” (i.e. the currently available machine), run:
- Repeat the above procedure for drbd1, where /etc/drbd.d/drbd0.res will contain:
resource drbd1 {
  protocol  C;
  device    /dev/drbd1 minor 1;
  meta-disk internal;
  disk      /dev/mapper/vg0-rep--drbd1;
  net {
    allow-two-primaries;
    after-sb-0pri discard-zero-changes;
    after-sb-1pri discard-secondary;
    after-sb-2pri disconnect;
  }
  on fiori {
    address 192.168.1.6:7791;
  }
  on torchio {
    address 192.168.1.7:7791;
  }
  handlers {
    before-resync-target "/sbin/drbdsetup $DRBD_MINOR secondary";
    split-brain "/usr/lib/drbd/notify-split-brain.sh root";
  }
}
OCFS2 cluster
- Create /etc/ocfs2/cluster.conf, containing:
node: ip_port = 7777 ip_address = 192.168.1.6 number = 1 name = fiori cluster = ocfs2 node: ip_port = 7777 ip_address = 192.168.1.7 number = 2 name = torchio cluster = ocfs2 cluster: node_count = 2 name = ocfs2 - Run:
dpkg-reconfigure ocfs2-tools
and when prompted
Would you like to start an OCFS2 cluster (O2CB) at boot time?
select Yes and for all following questions accept the default.
- Run:
service o2cb start
service o2cb online
- Repeat this procedure on the other node.
OCFS2 volumes
- Run:
MODE=mail                   #  For many small files
MNTPNT=/vol/ocfs2-small     #  For many small files
DEVICE=/dev/drbd0           #  For many small files
- On one node only, run:
mkfs.ocfs2 --fs-feature-level=max-features -T $MODE $DEVICE
- On both nodes run:
mkdir $MNTPNT
echo "$DEVICE $MNTPNT ocfs2  _netdev,noatime,data=writeback,commit=60,nodiratime 0 1" >> /etc/fstab
mount -a
- Run:
MODE=vmstore                #  For VM images
MNTPNT=/vol/ocfs2-large     #  For VM images
DEVICE=/dev/drbd1           #  For VM images
- On one node only, run:
mkfs.ocfs2 --fs-feature-level=max-features -T $MODE $DEVICE
- On both nodes run:
mkdir $MNTPNT
echo "$DEVICE $MNTPNT ocfs2  _netdev,noatime,data=writeback,commit=60,nodiratime 0 1" >> /etc/fstab
mount -a
Public mountpoints and NFS
Different steps in this procedure are to be run on different machines; see below for more details.
- On both nodes of the storage cluster, run:
mkdir /vol/rep-no/scratch
ln -s /vol/rep-no/scratch /vol/scratch
mkdir /vol/rep-no/vmpool0
ln -s /vol/rep-no/vmpool0 /vol/vmpool0
mkdir /vol/rep-unison/pub
ln -s /vol/rep-unison/pub /vol/pub
mkdir /vol/ocfs2-small/home
ln -s /vol/ocfs2-small/home /vol/home
mkdir /vol/ocfs2-small/mail
ln -s /vol/ocfs2-small/mail /vol/mail
mkdir /vol/ocfs2-small/wikis
ln -s /vol/ocfs2-small/wikis /vol/wikis
mkdir /vol/ocfs2-small/svn
ln -s /vol/ocfs2-small/svn /vol/svn
mkdir /vol/ocfs2-large/vmpool1
ln -s /vol/ocfs2-large/vmpool1 /vol/vmpool1
mount -a
- On both nodes of the storage cluster, run:
echo "/vol/pub           *(rw,no_root_squash,sync,subtree_check)" >> /etc/exports
echo "/vol/home          *(rw,no_root_squash,sync,subtree_check)" >> /etc/exports
echo "/vol/mail          *(rw,no_root_squash,sync,subtree_check)" >> /etc/exports
echo "/vol/wikis         *(rw,no_root_squash,sync,subtree_check)" >> /etc/exports
echo "/vol/svn           *(rw,no_root_squash,sync,subtree_check)" >> /etc/exports
- On both nodes of the storage cluster, run:
service nfs-kernel-server start
(This is needed because the exports file was empty when nfs-kernel-server was installed, nfs-kernel-server did not start. Ordinarily it is enough to run exportfs -av.)
- On the NIS server, add entries like the following entry to /etc/auto.home:
alexis -noquota,noatime,nodiratime,nfsvers=3 fiori.pasta.net,torchio.pasta.net:/vol/home/alexis
...
and add entries like the following entry to /etc/auto.staging:
pub -noquota,noatime,nodiratime,nfsvers=3 fiori.pasta.net,torchio.pasta.net:/vol/pub
and then run:
make -C /var/yp
- On all NFS clients run:
mkdir /staging
ln -s staging/pub /pub
Tuning
- As a workaround for BTS#666021, run:
sysctl -w vm.min_free_kbytes=65536
echo "vm.min_free_kbytes=65536" >> /etc/sysctl.conf
- As a workaround for the latency introduced by Powerline equipment:
- Add the following to /etc/drbd.d/global_common.conf:
common { ... startup { ... wfc-timeout 120; } ... net { ... ping-int 30; ping-timeout 60; } ... } - Change the timeouts on /etc/default/o2cb to be:
O2CB_ENABLED=true
O2CB_BOOTCLUSTER=ocfs2
O2CB_HEARTBEAT_THRESHOLD=61
O2CB_IDLE_TIMEOUT_MS=60000
O2CB_KEEPALIVE_DELAY_MS=4000
O2CB_RECONNECT_DELAY_MS=4000
- Add the following to /etc/drbd.d/global_common.conf:
- Due to BTS#476545, it is necessary to move all OCFS2-related mounts from being done by /etc/init.d/mountnfs.sh to elsewhere. At first I tried putting it all in /etc/rc.local but there were inconsistencies in the availability of resources (DBRD modes, etc) that made this too inflexible. In the end I used a script:
#!/bin/bash set -e PROGNAME=$(basename $0) # Configuration RESOURCES="drbd0 drbd1" # Globals OCFS2_MOUNT_OPTS="_netdev,noauto,noatime,data=writeback,commit=60,nodiratime" # Message functions info() { echo "$PROGNAME: INFO: $1" >&2; } warning() { echo "$PROGNAME: WARNING: $1" >&2; } error() { echo "$PROGNAME: ERROR: $1" >&2; exit 1; } pool_status() { local P S; P=$1; S=$(virsh pool-list | grep $P | awk '{ print $2 }'); info "pool $P has status $S"; echo "$S"; } # rep-unison if true; then info "rep-unison ..." exportfs -a 2>/dev/null || true fi # rep-no if true; then info "rep-no ..." [ "X$(pool_status vmpool0)" = Xactive ] || virsh pool-start vmpool0 fi # drbd - promote if true; then info "drbdX (promote) ..." for RESOURCE in $RESOURCES; do # Promote? ROLE=$(drbdadm role $RESOURCE | sed 's@/.*@@') [ $ROLE = Primary ] || drbdadm primary $RESOURCE # Check unmounted. MOUNTED_FLAG=$(cat /proc/mounts | awk '{ print $1 }' | fgrep -x /dev/$RESOURCE && echo true || echo false) ! $MOUNTED_FLAG || error "/dev/$RESOURCE: unexpectedly already mounted" # Don't fsck, because it may be mounted on the other node. ## Fsck and mount. #fsck -f /dev/$RESOURCE done fi # drbd - mount if true; then info "drbdX (mount) ..." for RESOURCE in $RESOURCES; do # Promote? case $RESOURCE in drbd0) MNTPNT=/vol/ocfs2-small ;; drbd1) MNTPNT=/vol/ocfs2-large ;; esac mount -o $OCFS2_MOUNT_OPTS /dev/$RESOURCE $MNTPNT done fi # drbd0 if true; then info "drbd0 (specific) ..." exportfs -a 2>/dev/null || true fi # drbd1 if true; then info "drbd1 (specific) ..." [ "X$(pool_status vmpool1)" = Xactive ] || virsh pool-start vmpool1 fi # This export should work! exportfs -av - To make kernel panics trigger reboots, run:
echo "kernel.panic = 10" >> /etc/sysctl.conf
sysctl -w kernel.panic=10
Switching to a back-to-back link for DBBD and OCFS2 traffic
With the insertion of a cheap 1GB NIC in both fiori and torchio and a network cable between them, then DRBD reliability is much greater than when traffic is routed through the Fritz!Box.
- On both nodes, edit /etc/network/interfaces and add a suitable stanza for new interface eth1.
- On both nodes, bring up the new interfaces.
- On one node, verify that the other node’s eth1 interface is pingable.
- On both nodes. stop whatever is necessary in order to unmount OCFS2 filesystems.
- On both nodes, unmount OCFS2 filesystems.
- On both nodes, down all DRBD devices.
- On both nodes, modify the IP addresses referenced in /etc/drbd.d/*.res to use the back-to-back link instead.
- On both nodes, up all DRBD devices and make them primary.
- On both nodes, modify the IP addresses referenced in /etc/ocfs2/cluster.conf to use the back-to-back link instead.
- On both nodes, mount OCFS2 filesystems.
- On both nodes, edit /etc/yp.conf and change this:
domain pasta.net broadcast
to this:
domain pasta.net server localhost
(This is needed because the IP address of the other node’s eth1 interface may reply before localhost does! Yes, really!)